


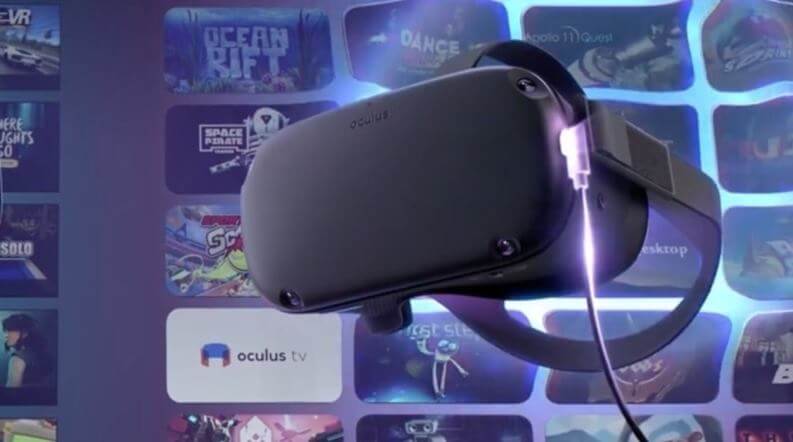
Connect Oculus Quest to PC and use PCVR titles
– Learn these tips and tricks on how to use your devices in a much easier way as well as solved some of your common problems that are difficult.
When buying a Oculus Questor as it is now called, a Meta Questyou use a whole series of games and applications that run directly on the device.
In addition to the many native titles available on the official store, it is interesting to know that it is possible to start games, technically more advanced, designed to be run using the processing power of a gaming PC.
This type of games are called PCVR in jargon. To run them, you need a way to connect your Oculus Quest to your PC (in order to make it work similar to an Oculus Rift). The PC will transmit everything to the Oculus and we can use it as a VR viewer for our computer.
In this guide we will delve into free methods to connect Oculus Quest to PC for use PCVR titles.
Oculus minimum requirements
First, to connect your Oculus Quest to the PC, you need to check the minimum requirements that the computer must have:
- CPU: Intel i5-4590 / AMD Ryzen 5 1500X or better
- RAM: 8 GB DDR4
- Graphic card: NVIDIA GeForce GTX 1060 Desktop of at least 6GB, or AMD CPUs starting from the 400 series
- Operating system: Windows 10 or Windows 11
- Wi-Fi: at least 8 Mbps
Once we have made sure that the PC meets at least these minimum requirements, it is time to connect the Oculus. In this case, we have two options: via cable O tramite AirLink.
If you choose a wired Oculus Link, you need a cable USB – USB Type C of good quality and at least 3m in length. There is an official connection cable, produced by Facebook, but from our tests it also works properly cheaper cables.
Here are the links to the official cable and some great alternatives:

- This premium quality fiber optic cable offers exceptional VR gaming performance on …
- Oculus Link connects the Oculus Quest and Quest 2 to a gaming PC to give you access to a variety of …
- The optimal length of 5 meters guarantees the best experience ever and maximum durability …

- Compatible with Oculus Quest 2: Syntech connection cable connects Oculus Quest 2 to PC from …
- Flexible cable 5 meters long: With 5 meters in length, this cable offers you maximum freedom …
- High-speed transfer and safe charging: supports bandwidth up to 5Gbps. The …

- Link cable for Quest / Quest 2 – The Link cable connects the headphones for Quest / Quest 2 to a gaming PC …
- 10 Ft Length Connection Cable – Ergonomic design reaches a length of 10 FT and …
- High Speed Data Transfer – USB 3.0 supports data transfer speeds of up to 5 …
If you choose to make a wireless connection, you need to opt for AirLink. For this type of connection, you must have a router with a 5 Ghz band, preferably placed in the same room as the viewer and connected with an ethernet cable to the PC, otherwise the quality will not be good.
After the requirements, let’s see how to make the connection to the actual PC.
Oculus Quest connection to PC with cable: Oculus Link
The function is really simple to use and is therefore very much appreciated; it only takes a few steps to see yours work Oculus Quest like an Oculus Rift.
Let’s see briefly how to proceed:
- install the Oculus app on your PC. You can download the application executable directly from oculus.com/setup;
- once installed and launched, log in with the same Facebook account used on the Quest;
- at this point you can connect the Quest via the USB cable to the PC and the notification will appear on the viewer asking if we want to launch the Link.
After confirmation and a short upload the new environment will be launched, white with lattice and with a new control bar. If by chance he refused and at a later time you want to enter “Link“, Just press on the area at the extreme left of the control bar where the clock is located and press the button of the same name.
Oculus Quest connection to PC: Oculus AirLink
Connecting via AirLink takes advantage of the Wifi connection to transmit data between the PC and the viewer. This is a beta feature and therefore must be enabled within the Quest.
Before proceeding, launch the Oculus app on your PC and make sure you are connected to the router (preferably via ethernet cable).
How to enable AirLink on Oculus Quest
First, put on the headset and start it, then with the controller:

- go to the control bar and press in the clock area to open the quick settings section;
- press the washer icon at the top to enter the “Settings“;
- inside “Settings“Go to the menu”Experimental“And within this enable the item”Air Link“;
- a screen with the requirements dedicated to the association will appear, we will be shown the PC with the Oculus application;
- just choose it and press confirm on the PC and device if the same code appears (in case of problems viewing the code, make sure that each of the two devices is in a version equal to or later than 34);
- to select “Start”To launch the connection.
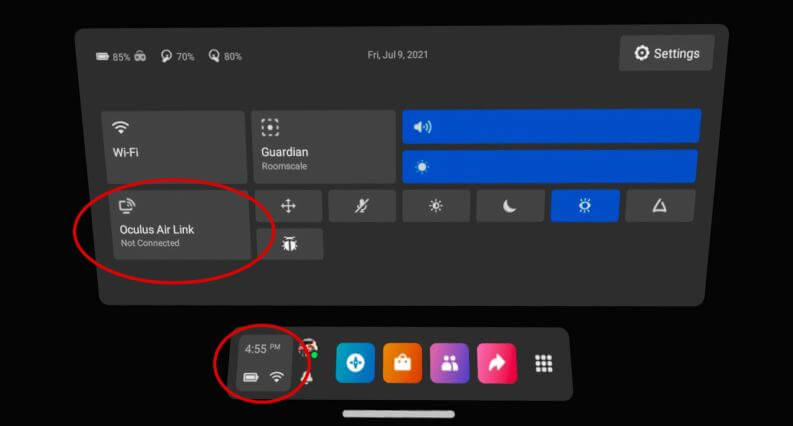
From this moment on, a notification will warn us if the PC is available for connection and this can be started comfortably by going to the control bar, pressing on the clock area and then on the “Air Link“.
The Oculus Link and Air Link environment
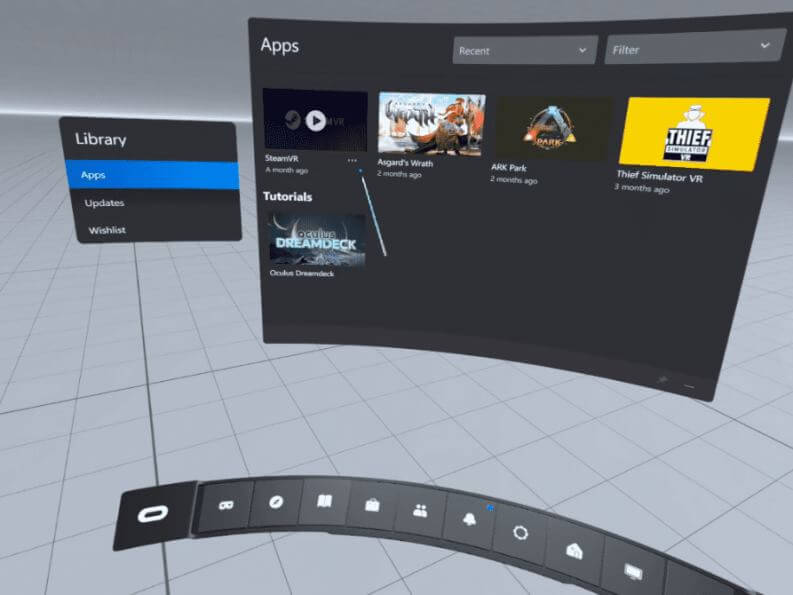
The environment will be different compared to what you’re used to on the Oculus Quest but still familiar, it will be white with a control bar at the bottom. The control bar is characterized by some buttons, just scroll them to see a description of them.
There are several new controls on the control bar, some familiar like the “Store“, Others different like the one in the form of a screen that allows you to see and control your PC.
Already in this mode, PCVR titles downloaded from the Oculus Store can be easily downloaded and started. They are normally purchased from the shop and then just go to the “Bookshelf“To launch them.
Some very important titles such as the spectacular Half Life Alyx are only available on SteamVR (although the title is also optimized for Oculus). If you are interested in these and in the games loaded manually from sources external to online stores, continue reading the last paragraph which will be dedicated to the topic.
How to use SteamVR on Oculus Quest
Once you’ve connected your headset via the Oculus app, it’s time to set up the VR version of Steam. First we need to install the Oculus application and connect the viewer via at least once Oculus Link O Air Link.
Once done, proceed to download Steam on your PC and log in. Once started, install the VR application on Steam: Steam VR.
We will be practically ready; from the viewer is necessary start the SteamVR app that will be in the library. After a loading period, we will see an environment from which it will be possible to conveniently launch games and apps on Steam.
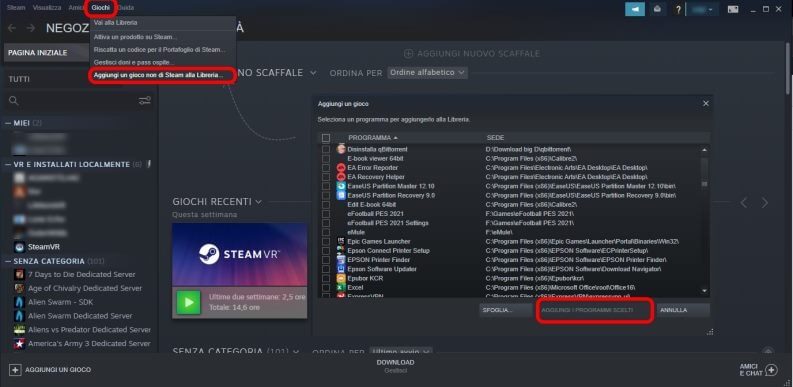
You can also add your own titles installed from external sources to the VR library.
To do this, just launch the Steam client on the PC, log in with your account, then click on “Games“, And then on”Add a non-Steam game to your library“, A list of installed applications will appear, if the chosen game is not among them, click on the”Browse“, Then find the executable (exe) of the game in question and press on”Add your chosen programs“. At this point it is necessary to find the game added in your library, click on it with the right mouse button, press with the left on “Property“And then on”Include in VR library“.
You know everything you need for connect Oculus Quest or Oculus Quest 2 to the PC and use PCVR titles. We therefore wish you a lot of fun!

Related posts:
 How to access Steam games without an internet connection
  How to view FPS with Xbox Game Bar in Windows 10: Steps Made Easy
  Hacked account? How to check and remedy
  How to make video calls from WhatsApp Web
  How to increase the RAM memory of a desktop or laptop + Tips and Tricks
  How to organize your YouTube subscriptions into categories
+ Tips and Tricks
How to organize your YouTube subscriptions into categories
+ Tips and Tricks


