


Error message Start PXE over IPv4 during boot in Windows 10/11
When booting your system over a network, you may see this error message «Start PXE over IPv4” has appeared on the black screen, completely stopping the boot process. This problem is a simple case of misconfigured boot configuration. You just have to reconfigure it correctly and Windows will start to boot normally. Follow these simple instructions to fix the problem.
Solution 1 – Reset Boot Settings
You can reset the boot configuration manually.
1. Let your computer boot up.
2. When the manufacturer’s logo appears, quickly press and hold the “Delete“* key to open the BIOS setup on your computer.
* NOTE– The actual key to open the BIOS setup may differ from manufacturer to manufacturer. These are the varieties of keys –
Esc, F1, F2, F10, F11, F12 or Delete
Pressing the assigned key will bring up the BIOS screen on your computer.
3. In the BIOS settings window, go to “world” tab with the arrow key.
4. Now scroll down to select “secure boot” and then press Get into.
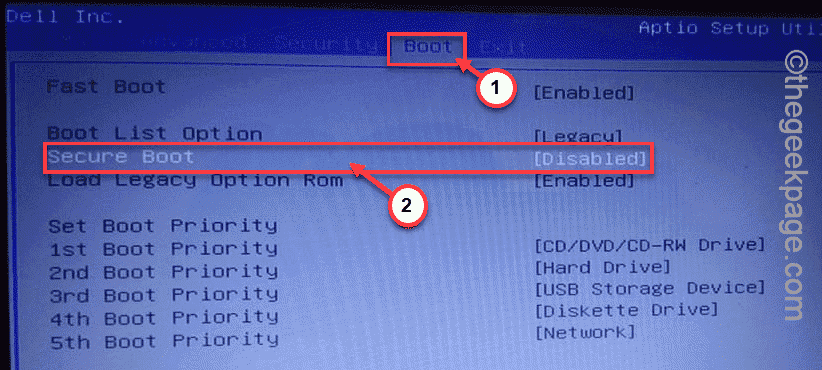
5. Now, choose “Disabled” in the drop-down menu and then press Get into to disable UEFA Safe boot on your computer.

6. Now press “F10” from your keyboard to save the settings to your computer.

7. Now, select “Yes” to finally save and exit BIOS setup on your computer.

After that let your computer boot normally.
Solution 2 – Disable embedded IPv6
You can easily solve it if you disable IPv6 in the boot priority setting.
1. Open BIOS setup on your computer.
2. Once you are there, go directly to “world” section.
Here, you will see that the boot option priorities are fully listed.
3. Now, you will notice that the boot priority is set to “Integrated NIC (IPv6)“.
4. Select that with the mouse and press Get into.

5. Set the boot priority setting to “Disabled“.
6. Once you are done, go to the “Exit” tab.
7. Here you will find the “Save Changes and exit“.
8. Now, tap on “Yes” To confirm.
This will send you back to the home screen. Just let it boot normally and it should work fine.
This should help you resolve the issue.
Solution 3 – Disable WOL in BIOS
If nothing works for you, just disable the Wake-on-Lan setting in BIOS.
1. At first, open the BIOS menu by following the steps we have discussed in Solution 1.
2. Then go to “Advanced settingstab » (on some computers, you can find the tab «Energy” tab).
3. Here, place the “LAN Activation” settings from here and set it to “Disabled“.
Now, to save the changes, press F10 and go out
Let your system boot normally. This should help you solve the problem once and for all.
Related posts:
 How to access Steam games without an internet connection
  How to view FPS with Xbox Game Bar in Windows 10: Steps Made Easy
  Hacked account? How to check and remedy
  How to make video calls from WhatsApp Web
  How to increase the RAM memory of a desktop or laptop + Tips and Tricks
  How to organize your YouTube subscriptions into categories
+ Tips and Tricks
How to organize your YouTube subscriptions into categories
+ Tips and Tricks


