


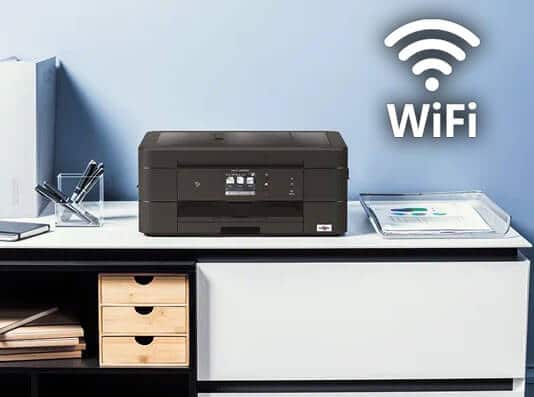
How to connect the printer to WiFi
– Learn these tips and tricks on how to use your devices in a much easier way as well as solved some of your common problems that are difficult.
Most printers now have integrated WiFi connection, this makes them very comfortable and versatile. Being connected via wireless connection, they can be connected with more freedom in the office and at home, allowing you to use a single printer with multiple PCs and mobile devices.
In this article we will see how to connect the printer to WiFi of home or office, in case we have one printer not equipped with wireless connectionand how wirelessly connect your printer equipped with a network card to a PC.
How to connect USB printer to Wi-Fi
It might happen that you have an old printer unable to connect to the WiFi networkin this case it is not certain that the time has come to replace the printer with a new one.
A convenient solution can be that of connect the printer directly to the USB port of your router. There are several routers, even among those provided by operators, which allow you to easily share hard drives and even printers on the network.
Cautionnot all printers are compatible with routers, and not all routers allow printer sharinghowever, it is worth trying to see if you are lucky.
Generally the use is really simple, just place the printer close to your router so you can connect it to the router via the USB cable and then turn it on.
The printer should now become a network device and therefore visible and reachable from any device connected to the same network.
If this doesn’t happen automatically, don’t worry, you probably need to enable an option on your router’s configuration screen (if available). In my router, for example, there is the following screen.
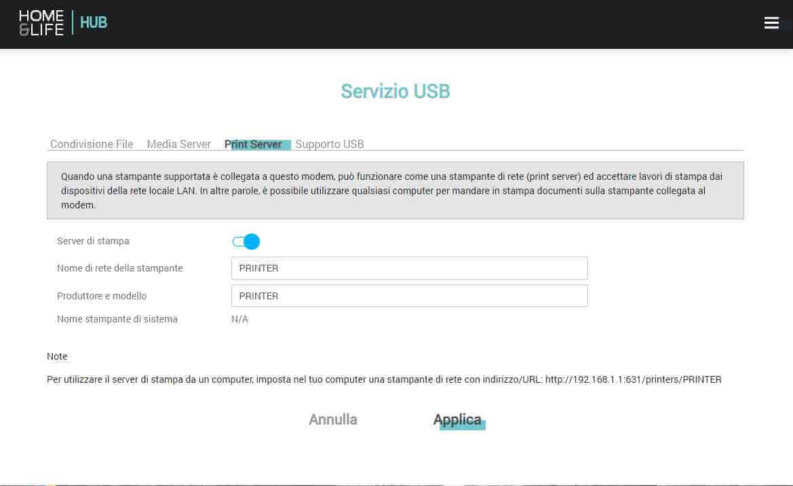
Per access the router configuration page usually just enter the IP address of your router as an internet address on any web browser of a device connected to the same network e on the login page, enter your credentials. If you do not know the access credentials it is likely that they are the factory ones that can often be found on a label attached to the device and certainly indicated in the manual.
The most common IP addresses for routers are:
192.168.1.1
192.168.0.1
192.168.1.101
192.168.1.254
192.168.0.254
Once you have entered the router management page, you usually have to proceed by looking for the “Media server“Or that”USB“. If your router supports network sharing of the printer, surely the option to enable it will be found in that section.
How to connect a WiFi printer with display to the PC
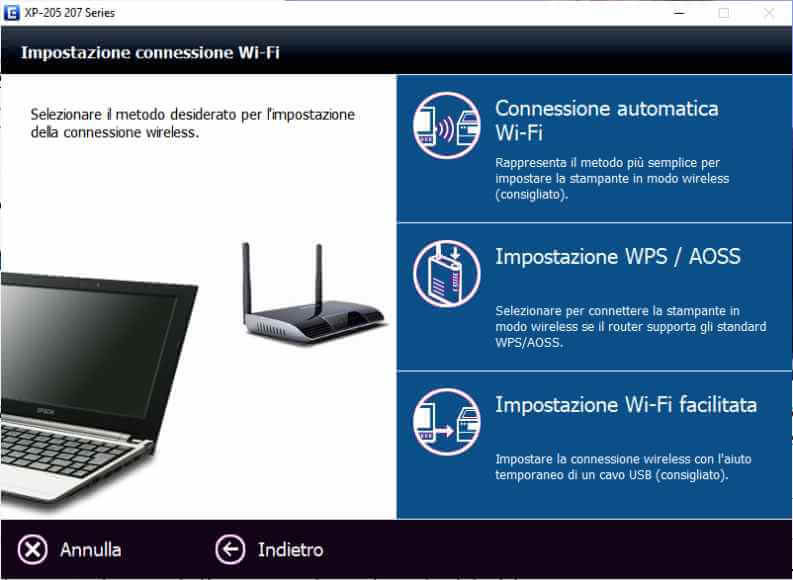
The first step is to connect your screen printer to the router’s Wi-Fi network. Procedures vary from model to model (for the specific procedure we always invite you to follow the instructions in the device manufacturer’s manual), but usually in models with a screen everything is very simple.
In fact they are enough few steps to use the WPS and allow a quick configuration. Usually just press the WPS button on the router and on the printer screen choose the item with the same name and the wizard to connect the printer to WiFi is happily successful.
Once we have managed to connect the printer to WiFi it is time to ask Windows to locate and install it. After making sure you are connected to the same wireless network, the steps are few and simple, on a PC with Windows 10 operating system just:
- switch on the printer and make sure from the attached screen that it is connected to the Wifi network;
- then on the Windows PC press the “Start“And then on”Settings”Characterized by the icon of a gear;
- click on the item “Devices“, Then press on the right on“ Printers and scanners ”;
- then at the top of the screen press on “Add a printer or scanner“;
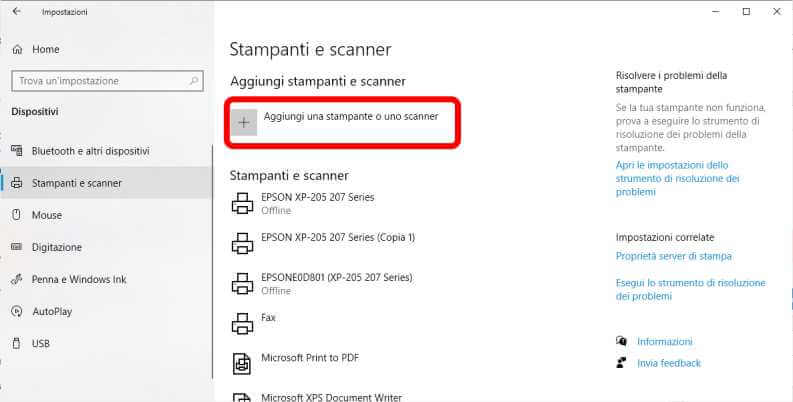
- then the search for the printer will start, once the device has been found just press on “add“.
After a short installation the printer will be configured and available.
The procedure is a little different for printers that do not have a display, remember that if this procedure does not work, we can use the procedure indicated in the following paragraph.
How to connect a printer without display to the PC
In the case of a Wireless printer that does not have a display you must use a completely different procedure for installation. In fact, it is necessary to use the special configuration tools made available by the printer manufacturer.
These tools are usually quite handy and are available on the CD included with the printer (along with the drivers), or on the manufacturer’s support site.
Here are the support pages of the major printer manufacturers:
Be sure to download the program for managing the printer via network in addition to the drivers.
Usually these printers, once their Wi-Fi module is turned on and enabled (some have a special button), have a LED that shows the operation and the connection status. Often the behavior of the LED tells us if the printer is correctly connected or not.
For more specific instructions it is always advisable to refer to the device manualif you do not have it at hand in paper version there is no need to fear, just a Google search by writing the word “manual”Followed by the printer model. The first or second result on Google will surely contain what you need.
Once turned on and with WiFi enabled, if the printer cannot find a wireless network to connect to, it will go into infrastructure mode. This mode creates a custom wifi network, which is normally only accessible through the configuration tool provided by the manufacturer.
Once the tool is launched, it will begin scanning, the program will locate the printer’s infrastructure network and you will be asked to indicate which wireless network you want the printer to connect to and what its password is. In short, the information will be transmitted to the printer which will then be able to connect to the home or office WiFi network. Generally, the installation tool also proceeds to configure the device directly on the PC so that you are immediately ready to print.
Sometimes it happens that the configuration via WiFi fails, usually almost all printers provide the possibility to configure the WiFi connection also via USB connection. In this case, you must connect the printer to the PC via USB cable and follow the instructions of the configuration program to the letter (they vary from device to device).
Only if this does not happen, after configuring the printer network access, you can carry out the procedure described in the previous paragraph.
What to do if the Wi-Fi printer does not work
It may happen that the printer does not work for several reasons, let’s see the most common:
- Momentary network errorit may happen that the printer simply “crashes” (sometimes just receiving an unexpected data packet), in this case to solve the situation usually just turn off the router for at least 15 seconds and then turn it back on and do the same with the printer.
- Wrong configurationit may happen that the configuration is not successful, in this case it is advisable to turn off the printer for at least 15 seconds and try again.
- Problem of connectionin this case you have to make sure that you are on the same network, and that this network is 2.4 GHz. The printers compatible with 5 GHz networks are currently very few.
If none of these initiatives are successful, it is advisable to contact the support of the specific printer. It may suggest and guide you in using some advanced network configuration tools, or diagnose a fault.

Related posts:
 How to access Steam games without an internet connection
  How to view FPS with Xbox Game Bar in Windows 10: Steps Made Easy
  Hacked account? How to check and remedy
  How to make video calls from WhatsApp Web
  How to increase the RAM memory of a desktop or laptop + Tips and Tricks
  How to organize your YouTube subscriptions into categories
+ Tips and Tricks
How to organize your YouTube subscriptions into categories
+ Tips and Tricks


