


How to convert HEIC to JPG on Mac
Need to edit iPhone photos on a device that doesn’t support Apple’s HEIC format? Don’t worry, you can convert your HEIC photos to JPG on your Mac and then transfer the converted images to your device.
HEIC is still a relatively new format and many devices and websites still do not support this image format. If you need your photos to work with sites or devices that don’t support the format, it’s helpful to know how to convert HEIC to JPG on a Mac.
What is HEIC?
HEIC is a compressed image format that Apple started using as the default image format with iOS 11. If your iPhone or iPad is running iOS 11 or later, it saves captured images in HEIC format by default.
Since HEIC is primarily an Apple-only format, you won’t find much support for it on devices from other manufacturers. This is one of the reasons why you need to convert your HEIC photos to a more widely used format, such as JPG or JPEG.
Convert HEIC to JPG on Mac using Preview
The easiest way to change HEIC to JPG on a Mac is to use Preview. Although you can think of this app as just a file viewer, it can also convert your images.
This is how you use Preview to convert your HEIC photos to JPG:
- Control-click on your HEIC image and select To open with followed by Overview. You can double-click instead of control-click if Preview is the default HEIC viewer on your Mac.
- When the preview opens, click the menu Office hour and select Export.
- Choose jpeg in the drop down menu Format, then drag the slider Quality to adjust the quality of the resulting file. Choose a folder to save your converted image to, then click Save.
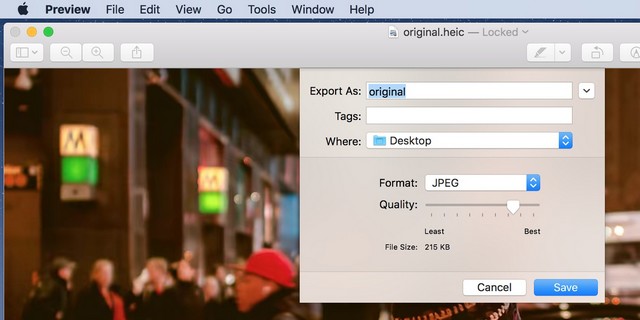
The preview will convert your HEIC photo and save it to the specified folder.
Use photos to convert HEIC images to JPG on Mac
If your HEIC images are stored in the Photos app, you can use this app to convert all your HEIC images to JPG using the Photos export feature.
That is how:
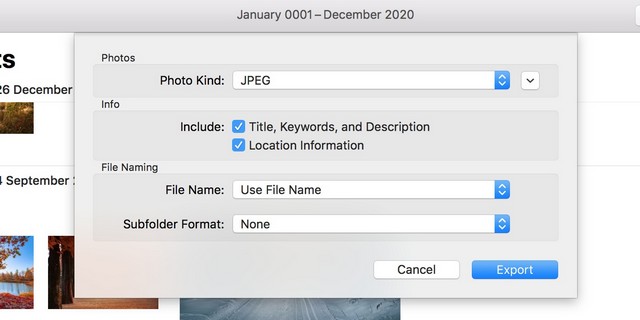
- If your HEIC image isn’t already in Photos, open Photos, click Office hour and select To matter to add your HEIC photo to the app.
- Select your image in the app, click on the menu File at the top, click Export and choose Export X photos (o X is the number of photos you have selected).
- Choose jpeg in the drop down menu image typereview the other options and click Export.
- Select a folder to save your converted image.
Use a free third-party app to convert HEIC to JPG on Mac
There are other applications that allow you to convert HEIC files to JPG on your Mac. One such application is iMazing HEIC Converter (free). It allows you to convert your images by dragging and dropping your photos on the application interface.
Here’s how to convert your photos with this app:
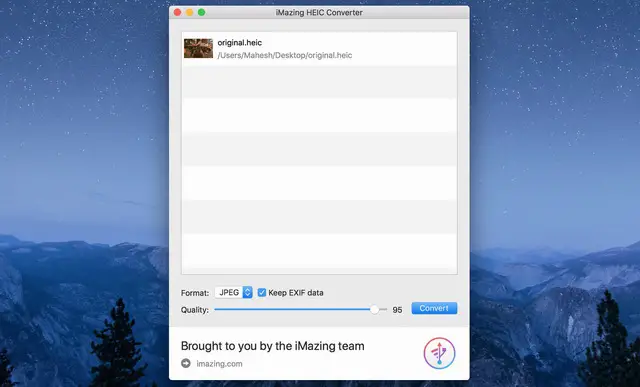
- Download and install the free iMazing HEIC Converter app, if you haven’t already.
- Launch the app once installed and drag all your HEIC files to the app interface.
- Choose jpeg in the drop down menu Formatcheque Retain EXIF data If you want to keep this data, choose the image quality and click Convert.
- Select the folder where you want to save the converted images.
- Click on show files to view your images as they are converted.
conclusion
HEIC is still a new format and only works on certain devices. If you plan to share your HEIC images with people who may use other devices, first use one of the options above to convert your HEIC to JPG. Once you’ve done that, you’re ready to share your photos with whoever you want.
If you have any questions or suggestions, let us know in the comments. Also check this guide if you want to learn how to convert pdf to jpg on mac.
Related posts:
 How to access Steam games without an internet connection
  How to view FPS with Xbox Game Bar in Windows 10: Steps Made Easy
  Hacked account? How to check and remedy
  How to make video calls from WhatsApp Web
  How to increase the RAM memory of a desktop or laptop + Tips and Tricks
  How to organize your YouTube subscriptions into categories
+ Tips and Tricks
How to organize your YouTube subscriptions into categories
+ Tips and Tricks


