


How to Create a Table of Illustrations in Word Easily – Complete Guide
–
Do you want to know how you can create and insert an illustration table using the Microsoft Word application? It is very simple, just follow the following steps that we will give you below in this complete guide that we have created for you.
What are the differences between the tables of contents and the illustrations?
Although both tools tend to work very similarly because it shows a general image of what your work contains, when creating or making your index, they present some of the following differences: one te will display a general table of contents (titles, subtitles).
On the other hand, the table of illustrations will show you where the images, photographs, graphics or others are located. It will take into account of them, the texts that exist in the writing and does not take into account the images that were inserted in it.
What are the tables of illustrations that we can make in Word for?
The tables of illustrations in Word will help you organize and list figures, pictures or tables of a document in the Word Application, for example, for when you have to do your degree work. This will allow you to identify each image and not only that, but also where it is found in the degree thesis.
What kind of images can we add to Microsoft Word tables?
To add images to a table in Word or simply when creating a new document, you can do it practically in any type of format that the image presents, some of these are extension jpg, png, jpeg, bmp, gif entre otros.
To insert it you can do it in two ways, one way to do it is to select the Insert tab, then if you have the image archived on your PC, select Images and a window will open for you to locate and insert the image from where you have it saved.
However, select Online Images If the image you want to insert from the Internet when locating it from Bing, just write in the box what you want to search for, then choose the photo you want and click on Insert and that’s it. And if you want to insert the image from the cloud, we recommend that you visit Microsoft’s Technical Support.
Considerations prior to preparing your table in Word
To create your table in Word you must insert all images that you want to insert in your special work, then, give each of them its identification so that when making the Illustration Table, it can be detected and center them.
If you make any changes to the name or if you have to move it to another page, try always update it manually to make the respective change of it. Then, insert a blank sheet by clicking on the Insert tab, select Blank Page, that’s where the Table of Illustrations will be displayed when you have already inserted and identified them.
What is the procedure to create a table of illustrations in our document?
The steps you must take to create a table of illustrations are very simple, just follow the guide that we will give you below:
- Insert a blank sheet, this will serve to locate the resulting table of illustrations, preferably place it after your index.
- Go to the tab Reference and then locate Titles where you must select the Insert Table of illustrations option.
- Immediately a pop-up window titled Table of illustrations will be shown, if you want to enable the Show page numbers box.
- Next, you can align the numbers or you can also select the place after the last word that you gave the title.
- If you chose Align page numbers on the right, your fill option can be dashed, line, or dotted.
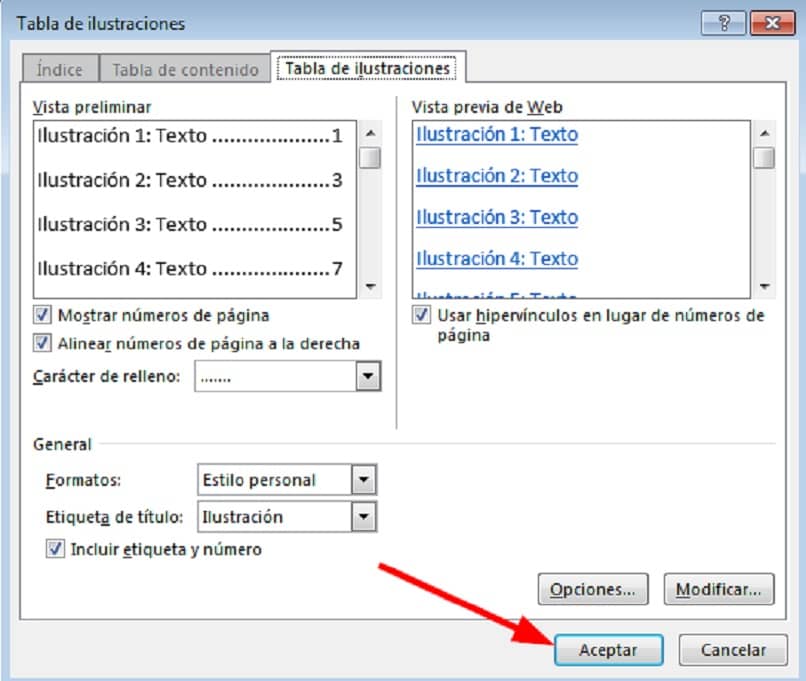
- Once you do the above, Click OptionsThere you will choose the style that your table will have, as well as the fields of the elements, the previous ones will help you modify your illustrations according to your need, and at the end you click OK.
- To make any changes to your font, you must choose the Modify option; you can also align your board to make it look more attractive; now if you want to delete the table, select it and then press the Delete key.
Related posts:
 How to access Steam games without an internet connection
  How to view FPS with Xbox Game Bar in Windows 10: Steps Made Easy
  Hacked account? How to check and remedy
  How to make video calls from WhatsApp Web
  How to increase the RAM memory of a desktop or laptop + Tips and Tricks
  How to organize your YouTube subscriptions into categories
+ Tips and Tricks
How to organize your YouTube subscriptions into categories
+ Tips and Tricks


