


How to easily configure FirewallD on Ubuntu Server
FirewallD is a complex firewall system for Linux operating systems. It ships by default on Fedora and many other Linux operating systems, and for good reason. It is powerful, highly configurable, and secure. But it is not good to configure it by hand.
If you don’t want to worry and want to get FirewallD up and running on your Ubuntu Server system so that you can get on with your work, this guide is for you. Follow along as we show you how to configure FirewallD on Ubuntu Server the easy way!
Webmin installation on Ubuntu Server
If you want to use the FirewallD module built into Webmin on your Ubuntu server, you will have to install the Webmin application. Fortunately, Webmin is compatible with the Ubuntu platform.
To start the Webmin installation on Ubuntu Server, start a terminal window and log into the machine via SSH. Or physically sit at the server. Then when you have access to the Ubuntu server terminal, enter the commands below to get Webmin working.
wget http://prdownloads.sourceforge.net/webadmin/webmin_1.981_all.deb
sudo apt install ./webmin_1.981_all.deb
Setting up Webmin on Ubuntu Server is pretty straightforward. However, if you need more guidance on how to make this program work on your system, we have you covered. Follow our guide on how to configure Webmin on Ubuntu Server.
Setting your root password
Using the Webmin web UI on Ubuntu Server requires access to the root password. However, Ubuntu closes the root account by default. Therefore, you must configure the password on the root account to be able to access it.
To set the password on the root account, use the sudo -s command to access root. This command gives you root indirectly.

sudo -s
With root level access gained, it is time to change the password. Using the passwd command, inform Ubuntu that the root password needs to be changed. For best results, make sure the root password is easy to remember and secure.
Note: If you need help generating a password, see StrongPasswordGenerator.
passwd
Now that the root account of your Ubuntu server is configured correctly, you will be able to log into the Webmin web user interface. To access the web user interface, open a new tab in your favorite web browser and visit the link below.
http://YOUR_UBUNTU_SERVER_IP_ADDRESS_OR_HOSTNAME:10000
Installing the “firewalld” package on Ubuntu Server
Webmin cannot interact with FirewallD on your Ubuntu Server system unless the “firewalld” package is installed. Unfortunately, unlike many other Webmin modules, Webmin cannot install the package automatically. You must do it yourself.
To install the “firewalld” package in Webmin, follow the step-by-step instructions below.
Paso 1: Log into the Webmin user interface using “root” as the username and the password you set as the password.
Paso 2: Find the menu on the left sidebar and click on it with your mouse.
Paso 3: Click the terminal icon in the sidebar at the bottom. This button will open a terminal window within your browser with root access.
Paso 4: Install the “firewalld” package on your Ubuntu server using the apt install command.
apt install firewalld -y
Paso 5: After installing the “firewalld” package on your Ubuntu server, you will need to unblock port 10000 via TCP, as your new firewall will block it from the Webmin user interface.
To unlock, go back to the SSH terminal you used to install Webmin and enter the two commands below.
sudo firewall-cmd --permanent --add-port=10000/tcp

sudo firewall-cmd --reload
When the firewall updates, press F5 in the browser to update Webmin. Then click on the “Update Modules” button at the bottom of the sidebar.
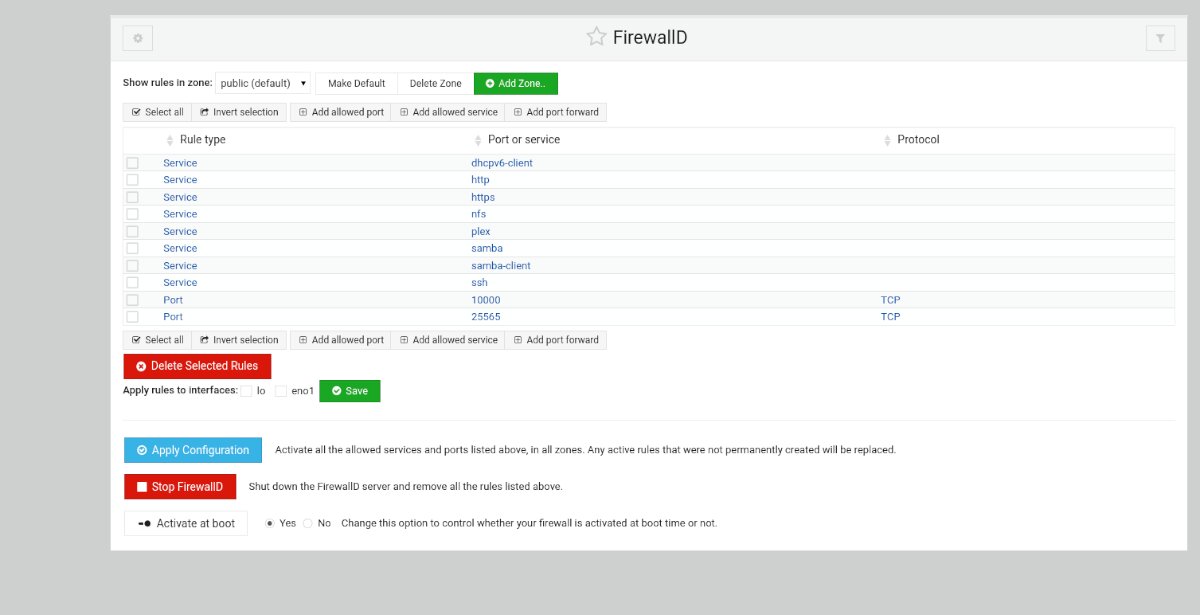
FirewallD configuration in Webmin
Access the “Networks” section of Webmin in the sidebar. Then click on the “Linux Firewall” button and follow the step-by-step instructions below.
Add ports
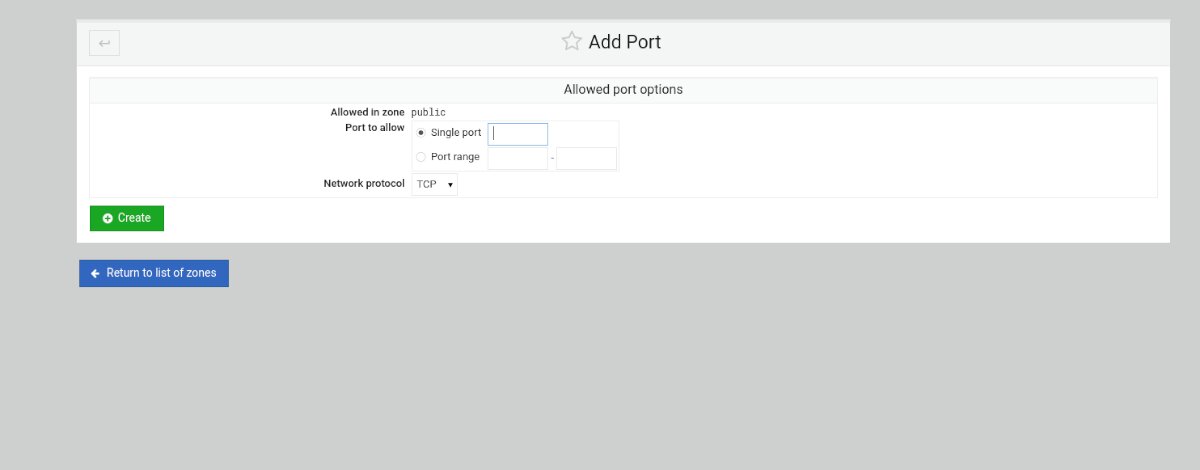
Paso 1: In the FirewallD section, find the “Add allowed port …” button and click it with the mouse to add a new port to the firewall.
Paso 2: After clicking the “Add Allowed Port” button, FirewallD will open the “Allowed Port Options” window. From here, search for “Single Port” and enter the unique port in the box. Or, if it is a port range, enter the range in the “Port Range” section.
Paso 3: Once you’ve entered the port details, find the “Network Protocol” section and set it to TCP or UDP.
Paso 4: Look for the green “Create” button and select it to add it to your list of rules.
Adding service
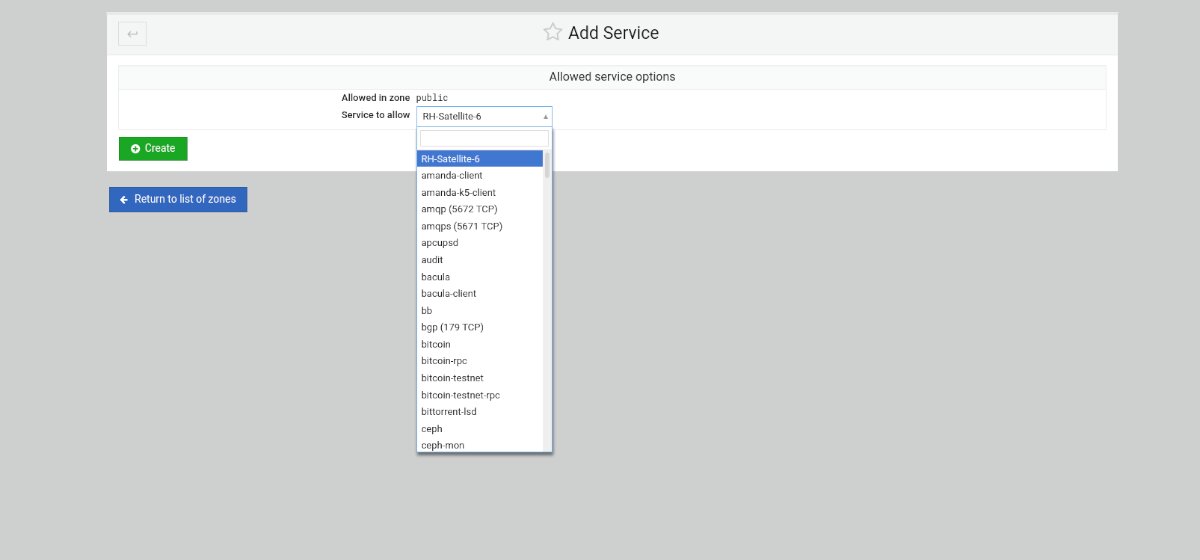
Paso 1: Select the “Add allowed service” button to open the menu of allowed services.
Paso 2: Find the “Service to allow” area and click on it with the mouse. Then type in the search box the name of the service you want to allow through the Firewall.
Paso 3: Select the green “Create” button to add your new service to the FirewallD rules.
Add port forward
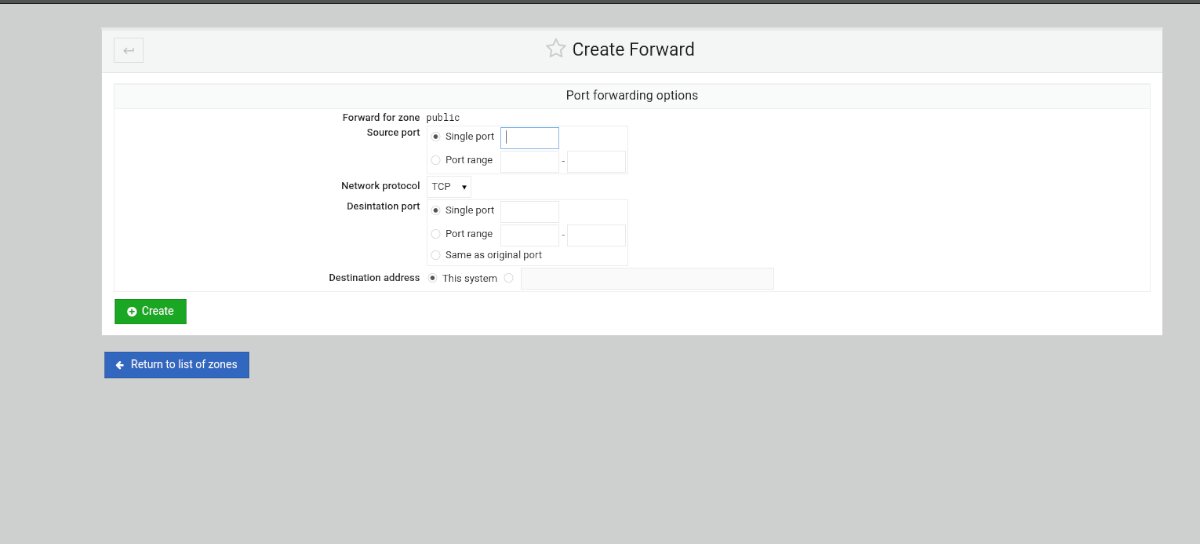
Paso 1: Select the “Add Port Forward” button within the FirewallD rules area.
Paso 2: Find the “Single Port” box and enter the port you want to forward. Or select the “Port range” box to add a port range.
Paso 3: Find the “Destination Port” and enter a single port or a range of ports.
Paso 4: Select the “Create” button to add the rules to the firewall.
Related posts:
 How to access Steam games without an internet connection
  How to view FPS with Xbox Game Bar in Windows 10: Steps Made Easy
  Hacked account? How to check and remedy
  How to make video calls from WhatsApp Web
  How to increase the RAM memory of a desktop or laptop + Tips and Tricks
  How to organize your YouTube subscriptions into categories
+ Tips and Tricks
How to organize your YouTube subscriptions into categories
+ Tips and Tricks


