


How to enable or disable hardware accelerated GPU scheduling in Windows 11
Many Windows users are not aware of the hardware accelerated GPU scheduling feature that was released with the Windows 10 updates around May 2020. Hardware acceleration is nothing more than offloading computer tasks onto some other hardware component. called the Graphics Processing Unit (GPU) -based scheduling processor, which will improve system performance and enable greater efficiency. Therefore, it is better to enable this feature on any Windows 10 or higher system because it is disabled by default. In this article, we will show you how you can enable hardware accelerated GPU scheduling on your Windows 11 system.
How to enable or disable hardware accelerated GPU scheduling in Windows 11
Paso 1: Press Win + me keys together on your keyboard to open the settings app.
Paso 2: Click on System in the left pane of the settings window.
Paso 3: Then select Monitor on the right side as shown in the following screenshot.
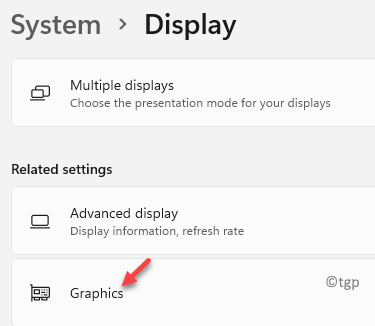
Paso 4: Scroll down the display page and click Graphics in Related Settings as shown below.
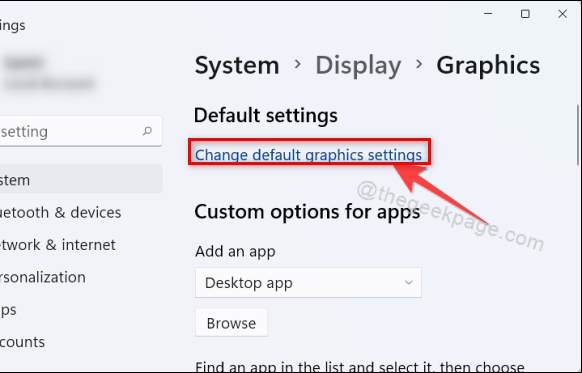
Paso 5: Then click Change the default graphics settings option in Default Settings on the Graphics page as shown below.
Paso 6: Click the toggle button that says Hardware-accelerated GPU programming to enable or disable it.
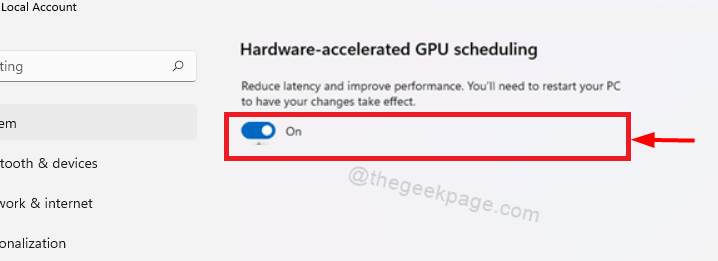
NOTE:– This option is available only on the system that has a graphics card with a certain amount of dedicated GPU memory.
In this way, you can enable or disable hardware accelerated GPU scheduling on your system, which can greatly improve the efficiency of your system.
That’s it guys.
I hope this article has been informative and helpful.
Please leave us your comments below.
Thank you for reading!
Related posts:
 How to access Steam games without an internet connection
  How to view FPS with Xbox Game Bar in Windows 10: Steps Made Easy
  Hacked account? How to check and remedy
  How to make video calls from WhatsApp Web
  How to increase the RAM memory of a desktop or laptop + Tips and Tricks
  How to organize your YouTube subscriptions into categories
+ Tips and Tricks
How to organize your YouTube subscriptions into categories
+ Tips and Tricks


