


How to fix Adobe Save for Web error issue
Adobe is very helpful not only when working on different projects, but the ability to export to a variety of file formats is often highly appreciated by the publishing community. But while exporting some files, you might see this error message on your screen: “Adobe Save for Web error. This operation could not be completed.“. So if you are in the same situation, looking for an immediate way out of this situation, you have just landed on the right page. But before you jump into the main solutions, try these quick fixes for an easy resolution.
alternative solutions –
COMMERCIAL
1. If this is your first time, close Photoshop, launch it, and try again.
2. Try exporting the file in a different format (such as .JPEG) or to a completely new location.
Solution 1: Decrease Image Size
Before you do anything, we suggest you take a look at the size of the image compared to the size of the canvas. If the image appears to be absurdly large (15,000 inches), try lowering the measurements to pixels and try again.
Now, if the size of the canvas is smaller than the image itself, adjust the canvas to be exactly the same size as the image or one size larger.
Now you can try to save the file for the web again. If the problem persists, look for the next solution.
Solution 2 – Edit the registry
If adjusting the image size doesn’t work, try editing the registry.
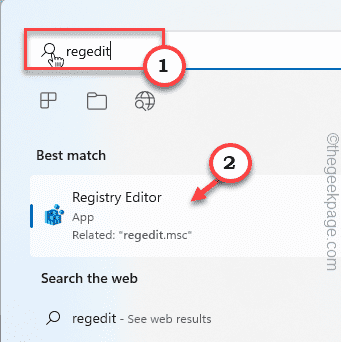
1. Type “regeditar” in the search box.
2. After that, tap «registry editor” to access it.
Warning – You are going to modify your registration. Since Registry Editor is a very important part of your system, you should back up the registry beforehand.
When Registry Editor opens, tap “Proceedings“. Then touch «To export” to create a new registry backup on your system.
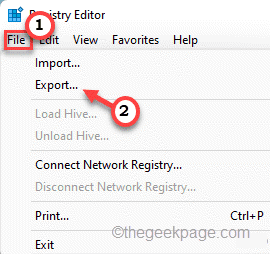
Later, you can use this backup if things go wrong.
3. Now, expand the left side like this~
ComputerHKEY_LOCAL_MACHINESOFTWAREAdobePhotoshop
4. Next, on the right side, select the key (which is a number) on the left side.
[In our case, it is “90“. It may change depending on which version of Adobe Photoshop you are using.]

5. On the right side, right click on the space and then click «New>” and “Valor DWORD (32 bits)“.

6. Name this value as “OverridePhysicalMemoryMB“.
7. After that, double touch to give it a new value.

8. Then set the value to “16000” and click “OK” to save these changes.

After creating this value, simply close Registry Editor.
Then, restart the system. After the computer restarts, launch Adobe Photoshop and try saving the file for the web again.
Solution 3 – Check the name
When saving the file, make sure you have named the file correctly. The file name must not have characters like @, -, _, , , etc. in the name.
In case you are saving a file associated with an animation that has a source video file, make sure that the source path does not contain any special characters that we have mentioned before.
Solution 4: Preview Image
If saving the image throws the error message, you can try to preview it and then save it in the browser.
1. Open the image file.
2. Then click “Edit” in the menu bar and touch “To export“.
3. Then touch “Save for web (legacy)” to export it.

4. On the Save for Web screen, tap “Advance…” to open the file in the browser.

This will open the file in the browser.
Now, you can save the file as you like directly from the browser.
5. Simply right-click the image in the browser and tap «Save Image As…“.

This may be a good workaround for the problem.
Solution 5 – Turn on optimized export settings
Some users have reported that turning on the optimized export settings may fix the issue.
1. Abra Adobe Photoshop.
2. Then press the button Ctrl + K keys together to open Preferences.
3. When the Preferences window appears, tap “Technological advances“.
4. Then, control the “Enable optimized export as” cash register.
After that, try to save the file for web and see if it works.
Solution 6 – Make sure Adobe Photoshop is up to date
Adobe fixes bugs like this regularly with regular updates.
1. Open Adobe Photoshop on your system.
2. Once Adobe Photoshop opens, click “Help” in the menu bar.
3. Next, in the drop-down menu, click on «Updates…” to check for Photoshop updates.

Now, you will notice several pending updates for all Adobe applications along with the pending Photoshop update.
You can update everything or just update just the Photoshop app.
After updating Photoshop, try saving the file again. Check if this works or not.
Solution 7 – Increase RAM usage
The issue can also occur if Photoshop is restricted to using less RAM than the amount available.
1. Launch Adobe Photoshop on your system.
2. Once Photoshop opens, press the Ctrl + K keys together.
This will open the Preferences panel.
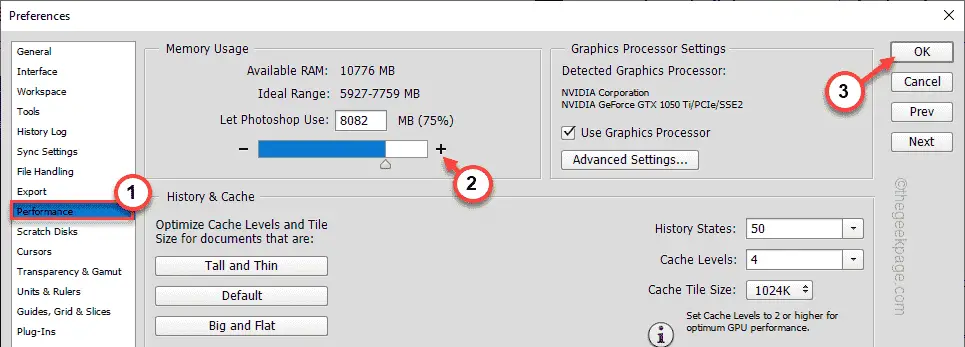
3. In the preferences opens, go to the «Performance” tab.
4. After that, on the right side, you will see the ‘Memory Usage’.
5. Simply click the button “+” to adjust the amount of RAM as you prefer.
We recommend that you allow at least 75% of free RAM for
6. Finally, click on “OK” to save the changes.
After that, close Adobe Photoshop and restart it.
Solution 8 – Reset Photoshop preferences
You can reset Photoshop preferences and fix the problem.
1. You have to open Photoshop if it is not already open.
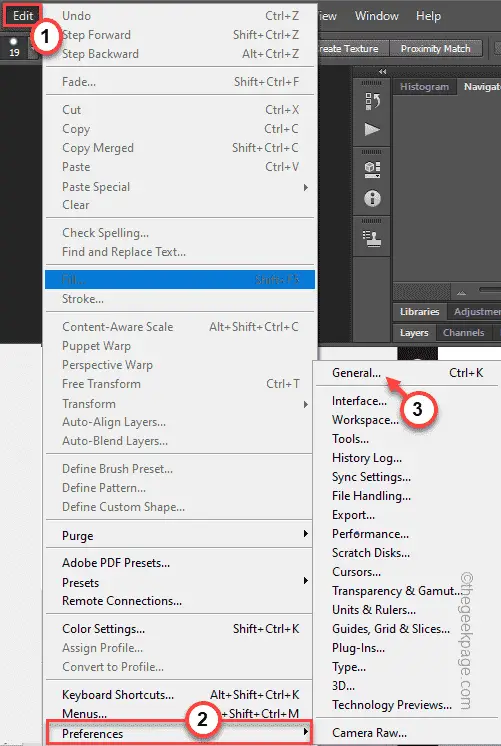
2. Now touch “Edit” in the menu bar.
3. Next, touch the button “preferences” menu to access it. Then tap on the «General” on the side panel.
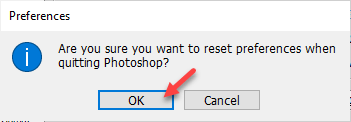
4. After that, press the button “Reset preferences on exit» option.

5. You will see a warning message on your screen. Then tap on “OK” to continue.
Now close Adobe Photoshop. Then restart it. Try saving the file for the web again.
Solution 9 – Empty the temporary folders
You need to empty the Temp folder and then check.
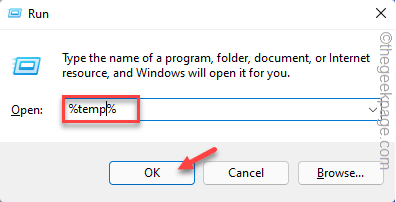
1. Just press the button Tecla de Windows+R keys together.
2. Then type this in Run and click “OK“.
%temp%
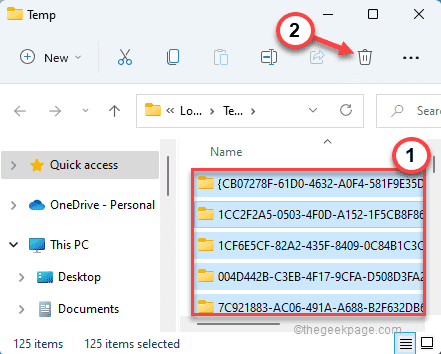
two . You will find various files and folders here.
7. Select all the files and tap the trash can icon to completely empty the folder.
8. On the File Explorer screen, follow this direction:
C:WindowsTemp
9. As before, select all the contents of the folder and press the “Erase” to empty it completely.

After emptying the folder, close File Explorer.
Open Adobe Photoshop and check whether you can save the image file for the web or not.
Your problem should be solved.
Related posts:
 How to access Steam games without an internet connection
  How to view FPS with Xbox Game Bar in Windows 10: Steps Made Easy
  Hacked account? How to check and remedy
  How to make video calls from WhatsApp Web
  How to increase the RAM memory of a desktop or laptop + Tips and Tricks
  How to organize your YouTube subscriptions into categories
+ Tips and Tricks
How to organize your YouTube subscriptions into categories
+ Tips and Tricks


