


How to fix the inability to start a DCOM server in Windows 11/10
DCOM stands for Distributed Component Object Model, which allows users to remotely start a server object and use its implemented methods. Microsoft developed this DCOM over COM for the best use of interface implementations. DCOM is basically platform and language independent and users can reuse most components without having to compile them over and over again. Some of the Windows users have reported that when they started using embedded applications / MS Office, they get an error in the event viewer saying “Cannot start a DCOM server.” There may be various reasons behind this and we have analyzed the situation and found some fixes that could be helpful in resolving this error. If you are also facing this same error then read this post which explains all the solutions effectively.
Solution 1: repair Microsoft Office Suite on your system
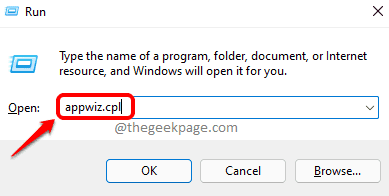
Step 1: Press Windows + R keys together on your keyboard to open To run dialog box.
Step 2: Then write appwiz.cpl in the run box and press the Get into keys to open the installed apps page.
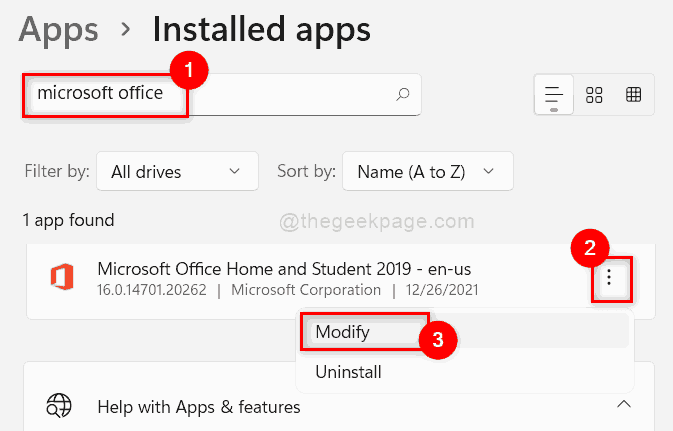
Step 3: Write microsoft office in the search bar on the Installed apps page.
Step 4: Then click three vertical dots (kebab icon) to see more options as shown below.
Step 5: select Modify of the list.
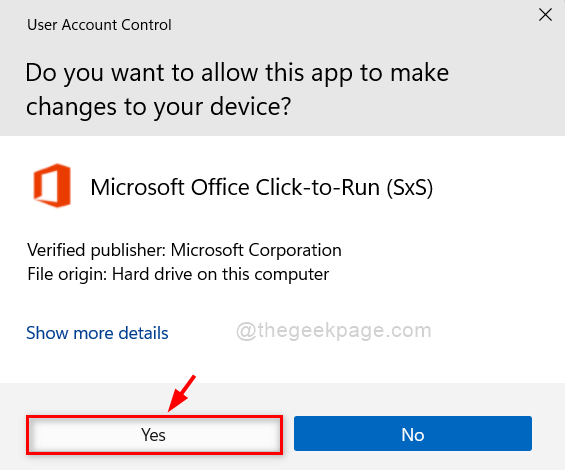
Step 6: click Yes in the UAC message to continue.
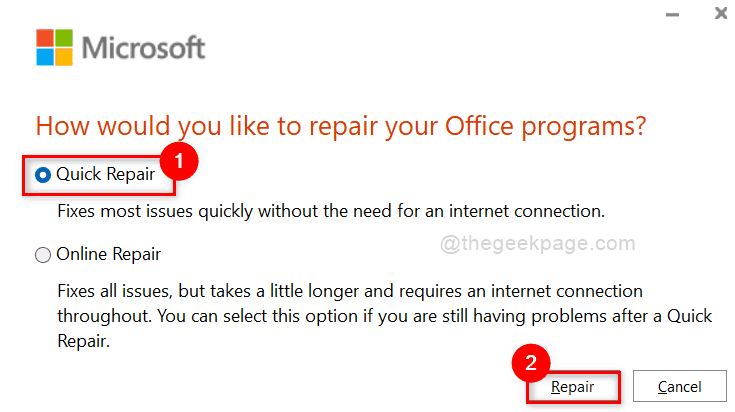
Step 7: select Quick repair radio button, and then click Repair to start repairing MS Office as below screenshot shown.
Step 8: After the repair is finished, reboot your system.
Check now if the problem is resolved.
Solution 2: uninstall antivirus software (third-party)
Step 1: Press Windows + R keys together on your keyboard to open To run dialog box.
Step 2: Then write appwiz.cpl in the run box and press the Get into keys to open the installed apps page.
Step 3: Type your antivirus name in the search bar on the installed apps page.
NOTE: I have written McAfee to show as an example. You can search for the antivirus installed on your system.
Step 4: Then click three vertical points Antivirus application icon in search results.
Step 5: select Uninstall from the list as shown in the screenshot below.
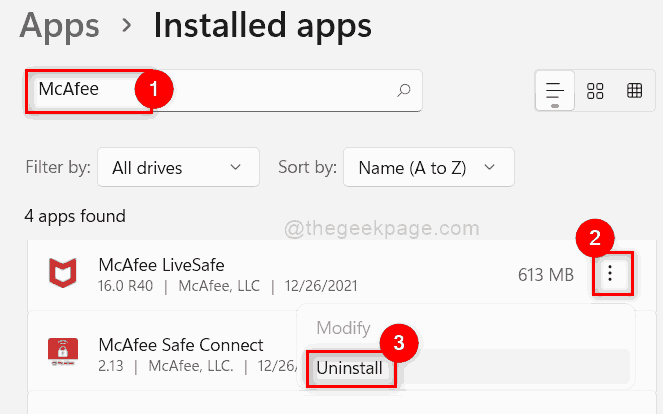
Step 6: then click Uninstall in the little pop-up window below the antivirus app.
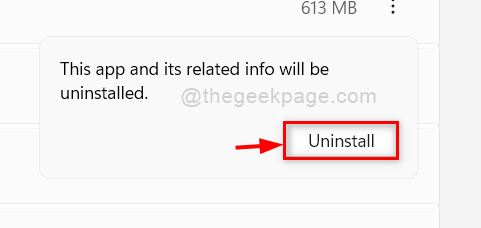
Step 7: Once done, click Yes in the UAC message to continue.
Step 8: Follow the instructions on the screen to uninstall the antivirus application on your system.
After the application has been successfully uninstalled, try to check if the error still appears.
Hope this has solved your problem. If not, try other solutions below.
Solution 3: remove firewall interference using Registry Editor
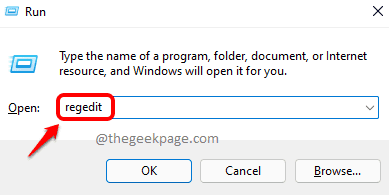
Step 1: Press Windows + R keys together on your keyboard to open To run dialog box.
Step 2: Write regedit in the run box and press Get into key to open the Registry editor on your system.
Step 3: click Yes in the UAC message to continue.
Step 4: Copy and paste the path given below into the clear and empty address bar of the Registry Editor.
HKEY_LOCAL_MACHINESYSTEMCurrentControlSetServicesSharedAccessParametersFirewallPolicyFirewallRules
Step 5: Then right click on the FirewallRules registry key on the left side of Registry Editor.
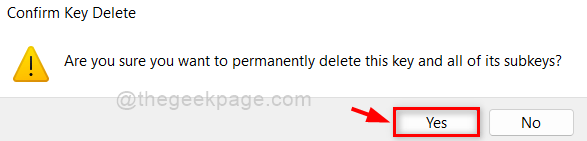
Step 6: click Delete in the context menu as shown below.

Step 7: click Yes to completely remove the registry key and all its subkeys.
Step 8: Clear the address bar and copy paste the path given below and press Get into wrench.
HKEY_LOCAL_MACHINESYSTEMCurrentControlSetServicesSharedAccessParametersFirewallPolicyRestrictedServicesConfigurableSystem
Step 9: right click on the System registry key and select Delete context menu option as shown below.
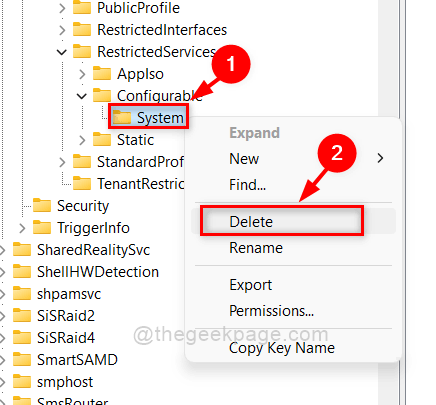
Step 10: Accept the key removal confirmation window by clicking Yes button as shown.
Step 11: Then, go to the path indicated below by copying, pasting it in the address bar and press the Get into wrench.
HKEY_LOCAL_MACHINESYSTEMCurrentControlSetServicesSharedAccessParametersFirewallPolicyRestrictedServicesAppIsoFirewallRules
Step 12: Delete the FirewallRules registry key by right clicking on it and selecting Delete in the context menu as shown below.
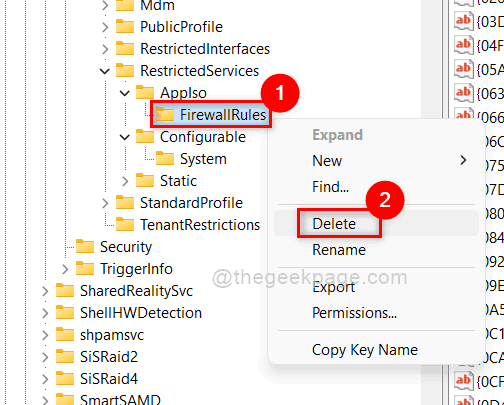
Step 13: Then click Yes button as shown below.
Step 14: Close Registry Editor and reboot your system once.
Now check if everything is working fine.
Hope this solves your problem.
Solution 4: Resolving the permission problem for QlikView users only
NOTE: This solution is only for users of the QlikView application.
Step 1: Open File Explorer by pressing Windows + E keys together on your keyboard.
Step 2: browse C: drive> Program files > QlikView application folder.
Step 3: Then go to Distribution service folder and double click qvb.exe file to open it.
Step 4: Now register the new Windows registry keys and GUIDs and reboot your system to apply the changes.
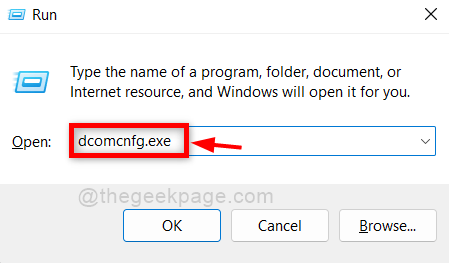
Step 5: Once done, press Windows + R keys together to open the To run dialog box.
Step 6: Write dcomcnfg.exe at to run dialog box and press the CTRL + SHIFT + ENTER keys to open the Component Services window.
Step 7: In the Component Services window, click Component Services option to expand it in the menu on the left side.
Step 8: Then click Computers> My Computer option and select DCOM configuration as shown in the following screenshot.
Step 9: On the right side of the window, find QlikView application and right click on it.
Step 10: Then select Properties (edit) from the context menu.

Step 11: In the Properties window, select Security tab and click Personalize radio button in the section Start and activate permissions.
Step 12: Then click Edit button as shown below.

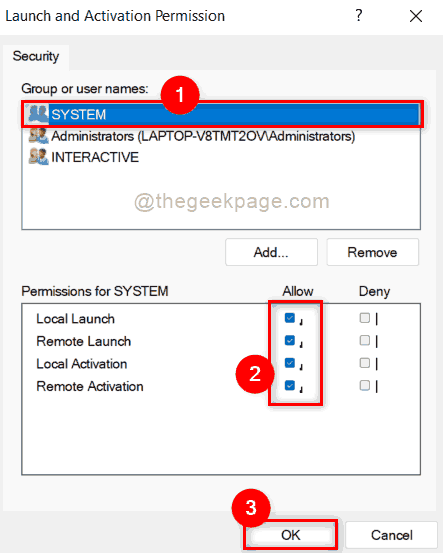
Step 13: In the Launch and Activation Permission window, select the Group or user names from the displayed list.
Step 14: Next, make sure that all permissions for that group or username are allowed by checking all the checkboxes.
Step 15: Once done, click OK to close the window.
Step 16: After this, close all Windows and reboot your system once to make changes.
Now check if the problem is solved.
Solution 5: troubleshoot in safe boot mode
Sometimes fixing the problem is the best way to fix it. So rebooting their system in Safe Mode with Networking will allow users to find if some other driver or software is causing this problem. Once you know the culprit for this error, you can resolve it by changing, updating, or uninstalling the software or driver. So, reboot your system in safe boot mode.
Hope the problem is resolved now.
That’s it, guys.
Hope this article was informative and let us know in the comment section below which solution helped you to resolve the error.
Thank you.
Related posts:
 How to access Steam games without an internet connection
  How to view FPS with Xbox Game Bar in Windows 10: Steps Made Easy
  Hacked account? How to check and remedy
  How to make video calls from WhatsApp Web
  How to increase the RAM memory of a desktop or laptop + Tips and Tricks
  How to organize your YouTube subscriptions into categories
+ Tips and Tricks
How to organize your YouTube subscriptions into categories
+ Tips and Tricks


