


How to make a Histogram in Excel to Analyze the Frequency of Data
–
Statistical data analysis is key in the study of various phenomena associated with events or activities in daily and industrial life. One of these tools is histograms which are generally column charts associated with a data frequency.
A kind of particular histogram turns out to create a Pareto chart. In this post we will talk about how to make a histogram in Excel to analyze the frequency of data.
On what devices can a histogram be made in Excel?
Microsoft Excel is an office tool that is compatible with many operating systemss (SO), that is why you will be able to carry out the activities allowed by this software on various devices; Among the devices that you can use to develop a histogram in Excel are the following:
In Windows
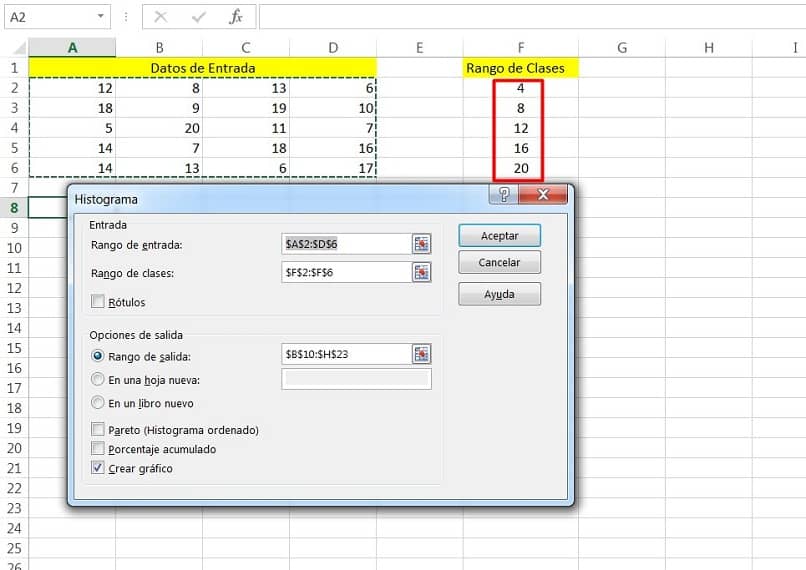
Before starting the procedure to make your histogram, make sure that the data analysis tool is active in your version of Excel; for it visit Microsoft’s official website and follow the instructions to load analysis tool in Excel. Then follow the steps below to get your histogram:
- Open a new spreadsheet and put in your data for analysis, better known as input data.
- Try to keep your data organized in a matrix of “n” rows by “m” columns.
- In a separate column put your “class rank”.
- Navigate the top menu to the “Data” tab, and then select “Data Analysis”.
- Look for the option “histogram” and click on it.
- Click “Accept” and a pop-up window will appear that you must fill out.
- In “Input range” select the data of the matrix indicated in the second point.
- In “Class range” put the data corresponding to the column with the same name.
- The “Output Range” is worksheet space where the resulting table generated by the data analyzer will be placed.
- Finally, click or click on the “Create Chart” option to generate the column chart.
- Then click on “OK” and you will have the histogram you are looking for as a result.
On macOS
- Choose the data with which you want to form your histogram, you can place them in a column.
- Navigate the menu and choose “Insert”, then look for the option with the graph or statistic symbol and click on it.
- Select the option “Histogram” and that’s it, you will have your graph.
From Android
- Select the data.
- From your mobile, press the “Edit” option and then navigate in the menu to “Insert”, find the option “graph” and choose “histogram”.
- Al click on “Histogram”, you will have your chart ready.
On iOS
Follow the same steps that we showed you in the previous section for Android devices, and by complying with these you will get your graph or Histogram.
What data should a histogram contain?
We have already shown you how to obtain your histogram on various devices with different operating systems, however, you need to take into account what data should have your graph. To do this, we will tell you below what these data should be:
Input data
This is the data that will be analyzed for the elaboration of the histogram. It is important that you keep in mind that these amounts cannot be alphanumeric, that is, they have to be numbers or quantities that can be processed as such. You have the possibility to use tables in Excel and use them to organize this data.
Location numbers
This concept corresponds to the intervals or ranges of input data that will be used to classify and group the amount of data in each of these; that is to say, Its about typical “class range” that is used in a table of ordered data with their respective frequencies.

How do you make a histogram in Excel using the add-ins?
As you may have noticed, there are several ways to make a histogram in Excel, so you can choose the one that is easier for you or to your liking. In addition, you must take into account the nature of the data range; Well, you will find situations that are simple and direct action, and others that require additional steps, for example:
With the same class rank
This situation is the simplest, since the class range is found divided into intervals of equal value, so the resulting frequency is the data with which the histogram will be made. In this case, the procedure that we have explained so far will help you.
With different class ranges
This type of situation changes the procedure to obtain the histogram, since the class interval width difference, does not allow obtaining a correct graph or histogram directly. In this sense, you will have to make an adjustment in the source data, to obtain additional study columns that will be those that you represent in the histogram.
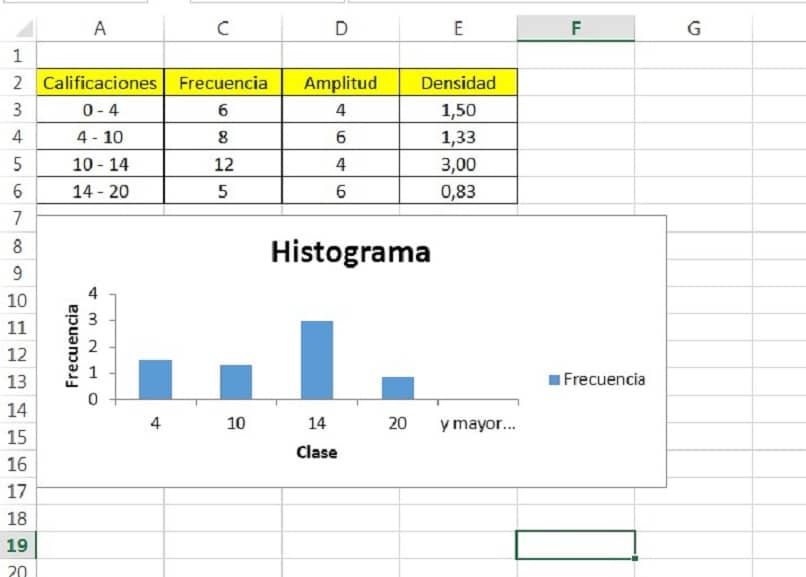
A class interval width column and another frequency density column they are necessary to make this type of histogram. The width of the class interval is obtained by subtracting the upper limit from the lower limit of each interval, and recording it in the row corresponding to each interval.
Then you must find the frequency density, and this is achieved by dividing the frequency of each interval by the amplitude of each interval; the resulting value you must register it in the cell corresponding to the row of each interval with respect to the frequency density column.
By having the complete frequency density data, you can proceed to make your histogram by following the steps mentioned in the corresponding section; you should only replace original input data by the data corresponding to the column “Frequency density” in the “Input range” field, while in the “Class range” field you must enter the current class interval.
Finally, you should know that Excel is a very powerful software that will not only allow you to manage histograms, but also allow you to create graphs of another nature from tables with data. So it is a very versatile tool. We hope this entry has been to your liking and usefulness.
Related posts:
 How to access Steam games without an internet connection
  How to view FPS with Xbox Game Bar in Windows 10: Steps Made Easy
  Hacked account? How to check and remedy
  How to make video calls from WhatsApp Web
  How to increase the RAM memory of a desktop or laptop + Tips and Tricks
  How to organize your YouTube subscriptions into categories
+ Tips and Tricks
How to organize your YouTube subscriptions into categories
+ Tips and Tricks


