


How to recover a deleted post on Facebook
A few days ago you had spent some time looking for a quote to put it in a post on your profile Facebook. Once the content was published, however, fearing that that quote would reveal too much about you and what you think, you decided to delete the post in question. Now, however, with a cool head, you have had a new afterthought: you would like to retrace your steps and restore the content you had previously published, but you do not know if there is such a function.
Well yes! The answer to your question is affirmative and, if you rely on this tutorial of mine, you will soon be able to know in detail how to recover a deleted post on Facebook. I can assure you right away that it is simpler than you can imagine and you can act both as a smartphone and tablet as well as a computer: it is only up to you to choose the “path” that seems most suitable for you.
As I will explain in the next lines, there is only the “time factor” to consider. In fact, only posts deleted within a certain period can be recovered. Having said that, if you agree, let’s not dwell further and move on to the actual guide. I wish you a good read and I wish you a big good luck for everything!
Preliminary information
Before moving on to the practical side of the question, let me deepen the time issue mentioned in the opening bars of the guide.
As mentioned, if you want to recover deleted posts from Facebook, there is a maximum time frame within which action must be taken. More specifically, Facebook has established that content previously published and then deleted from your Diary can be restored within 30 days from the actual elimination. Posts deleted for more than 30 days are permanently removed automatically and are therefore irrecoverable.
When you delete content posted to your Timeline, Facebook moves it to a private area, called Trash can, which is visible only to you. This section of your profile is accessible via the function Activity log account. Haven’t you ever heard of it? I’ll briefly explain what it is then. The Facebook activity log is a sort of “history” of all the operations performed on the social network.
“Like”, comments, reactions, personal information, searches made, logins and disconnections, friend requests received and sent: all this and more can be viewed thanks to the functionality I’m talking about. The Activity Log offers you a summary of the operations you have carried out, showing you from the most recent to the most remote, and also allows you to remove or hide the various contents published on the Diary from the Diary.
I will explain in the next chapters how to access the Activity Log to restore deleted posts on smartphones, tablets and computers. I also inform you that you have the possibility to recover content deleted from the Diary even if yours account it was deleted (provided that the cancellation of the post and that of the account took place within the aforementioned period of 30 days).
In this case, you will first need to restore your Facebook account: to know how to do this, read this tutorial. Through the settings of your Facebook account, you can also create a copy of the data and content relating to your profile, including all post published. I will dedicate the last few chapters of this guide to show you how this option works.
How to restore a deleted post on Facebook
I’ll show you now how to recover an accidentally deleted post on Facebook acting both from smartphone e tablet that gives computer. Find everything explained below.
From smartphones and tablets

If you want to find out how to recover a deleted post on facebook gives smartphone The tablet, start the application of the famous social network (available for both Android that for iOS / iPadOS) and, if necessary, log in to your account.
Then click on the icon … on the right (next to the button for add a story) and, on the page that opens, tap on the item Activity log, in order to access your activity log.
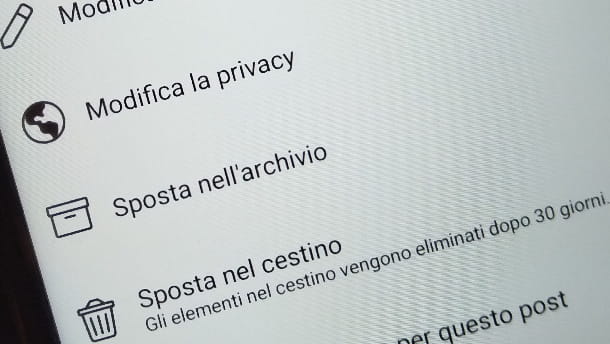
Now, hit the button Trash can located at the top right: in this way you will be shown all the deleted posts from your Diary within the last 30 days. To restore one, simply tap on it and press the button Reset, down.
Then confirm the operation by pressing the button once again Reset, and that’s it: the post will instantly return to your Dario at the exact date and time you originally posted it.
By pressing the button instead Archive, the post will be moved toArchive and, in the future, it will only be visible to you (but it will not be deleted anyway). To open the Archive you just need to go back to the icon menu … of your profile and then click on the button Archive.
If, instead of the app, you use a browser to view Facebook, just connect to home page del social network and log in. Once this is done, press on yours profile picture, top left, and follow the same steps I listed above to the letter. In this case, in fact, the operation of the application is totally similar to the browser version of Facebook. Easy, right?
From computer
You are wondering how to recover a deleted post on Facebook its a PC or a Mac? I’ll explain it to you immediately. First, log in to Facebook using any browser and click on Name of your profile, top right.
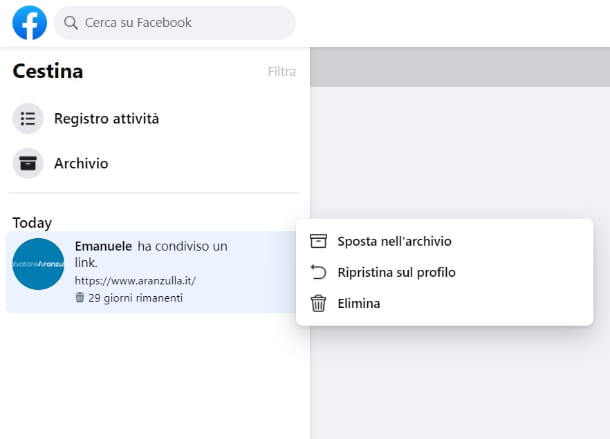
At this point, on your profile page, click on the icon … located at the top right and, from here, click on the item Activity log, to access your Activity Log. Then click on the item Trash can (top left) and, on the page that opens, you can see the list of deleted posts from your Diary in the last 30 days.
To restore one, just click on the icon … which is shown if you move the mouse cursor over it and then click on the item Reset to profile. Finally press the button Reset, to confirm, and that’s it. This way the post will be automatically moved to your Diary and you can view it by scrolling it until you reach the date and time when the restored content was initially published. See how easy it was?
If, in the last step I showed you, tap on the item Move to archive (instead of clicking on the item Reset to profile), the post will be placed in the personal archive of your account and, in the future, will remain visible only to you.
To access the Archive, just go back to the icon menu … on your profile page and click on the item Archive. By pressing the icon again Archive (top left) you will then be able to view all the elements contained in this private area.
How to recover old Facebook posts
Did the previous procedure not give the desired result? Are you going to delete your Facebook profile but still want to prevent your posts from disappearing into thin air? If that’s the case, you can safely use the built-in function in the social network that allows you to download all your account data, including posts, in a practical archive to keep offline. Here are all the details.
From smartphones and tablets
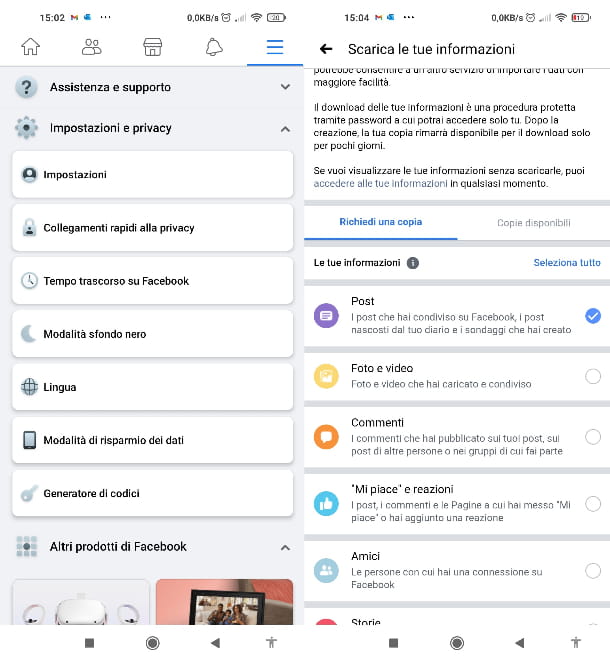
If you wish to act from smartphone The tablet, open theofficial Facebook application per Android or for iOS / iPadOS) and, if necessary, log in to your account; then press the ≡ icon, scroll down the page that opens and tap on the item Settings and privacy.
At this point, press on the item Settings, scroll through the list you see and press on the item Download your information. In the list of elements, the latter will be automatically already all selected (posts, photos and videos, friends comments, “likes” and reactions and so on). Then just press on caselle next to names of the various items that you do not want to download, to deselect them.
Finally, you can decide in what format to save the copy, by clicking on the item Format at the bottom of the page: the available ones are HTML and JSON. To open the first ones, a browser navigation, while for the seconds you will need the app that you find in the tutorial that I just linked to you. Once you have chosen the format, all you have to do is press the button Create the file.
A request will then be sent to Facebook which will automatically create the copy within a certain variable period of time (it can take hours or whole days; however, you will receive a notification as soon as the copy is ready). Once the copy is complete, to download it, simply go back to the menu item Download your information and press on the item Copies available.
Finally, you will have to press on the button Download. The steps explained so far remain valid even if you use Facebook from a browser.
From computer
If you prefer to act from computer, log in to Facebook from browser, click on arrow pointing down located in the upper right corner (next to the icon of the notification bell) and click on the items Settings and privacy e Settings.
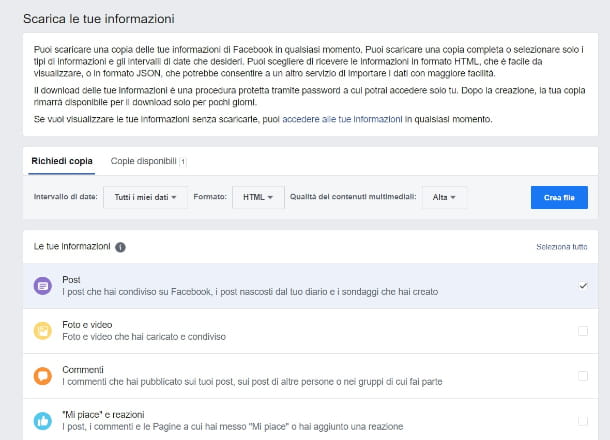
On the page that opens, click on the item Your information on Facebook (you can find it in the list at the top left) and, from here, click on the item Download your information. Then select the caselle related to the elements you want to download (the posts are the first in the list, so leave them selected) and choose the format in which to download the archive with your data (HTML or JSON) by pressing the button next to the item Format.
Finally, click on the item Create file and wait for the copy of the data to be completed by Facebook. It could take days, depending on the amount of data to be processed. Once the copy is ready, you will receive one notification. To download the copy of your posts, you will then have to go back to this last menu and click on the button Download. It didn’t take long, do you agree?ted doubts. He has published for Mondadori and Mondadori Informatica.
Related posts:
 How to access Steam games without an internet connection
  How to view FPS with Xbox Game Bar in Windows 10: Steps Made Easy
  Hacked account? How to check and remedy
  How to make video calls from WhatsApp Web
  How to increase the RAM memory of a desktop or laptop + Tips and Tricks
  How to organize your YouTube subscriptions into categories
+ Tips and Tricks
How to organize your YouTube subscriptions into categories
+ Tips and Tricks


