


Setup failed to validate product key issue on Windows 11/10
Installing a new Windows 11 on a system consists of a few preliminary steps, with product key validation being the most important part. Windows will not start installing unless you validate a 25 character product key. In case the product validation fails, you will see an error message such as «The installation program could not validate the product key“. Do not worry. There are a few fixes that you can use to fix the problem or use an alternative method to skip the key validation step.
Solution 1: move around with a configuration file
You can manually create a configuration file that can help you solve this problem. If you are using a Windows 11/10 ISO, you need to mount it first.
Step 1 – INSTALL 7zip
if you have 7zip already installed on your system, you can skip these steps.
1. First, open this Link and download the 7-zip installation file on your system.
2. Then double touch about him “7z2106-x64“.
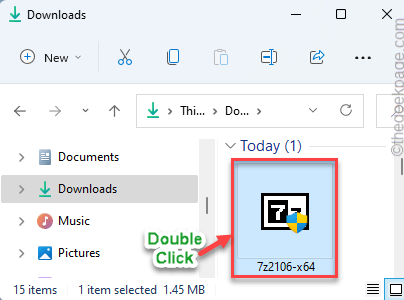
3. Finally, touch the button «Install on pc”To install the 7zip application.
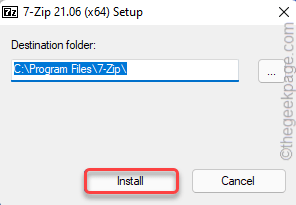
This will install the 7zip on your system.
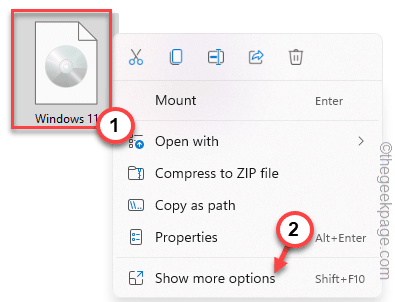
Step 2: extract the Windows ISO file
You have to extract the Windows ISO file.
1. Now open File Explorer and navigate to the location of the Windows ISO file.
2. Then, right-click on the Windows ISO file and tap “Show more options“.
3. After that, tap «7zip>“And then touch”Extract files …”To extract these files.
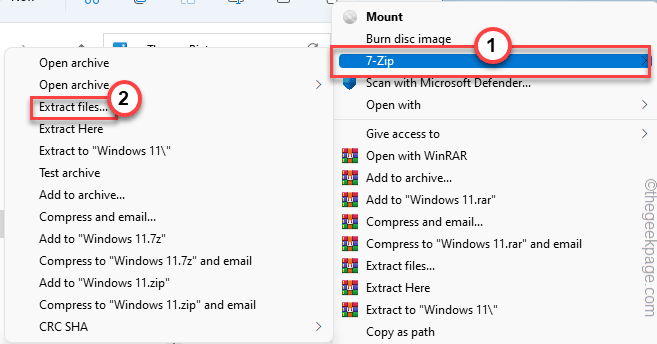
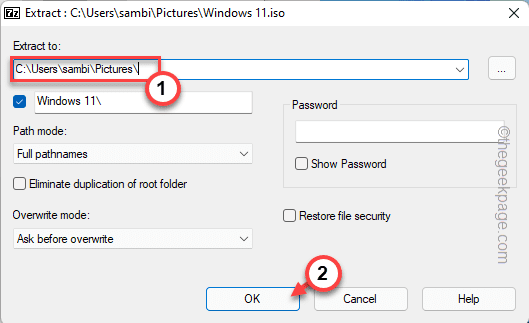
4. Now choose a location to extract these files. Remember the location where you are extracting these files.
5. Then tap «OK“.
Once you’re done, tap «Near“.
You can close the File Explorer window.
Step 3: create a configuration file
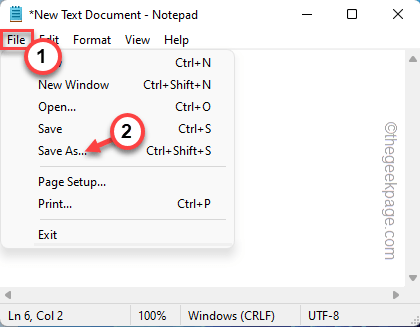
1. At first, open an empty Notepad window.
2. Then, copy take these lines in Notepad, depending on the edition of Windows you are installing.
For the professional edition –
[EditionID]
professional
[Channel]
Retail
[VL]
0
Para Enterprise Edition –
[EditionID]
enterprise
[Channel]
Retail
[VL]
0
3. Then tap «Archive“And click”Save as…»Option.
4. Now navigate to the “Windows 11” folder where you extracted the Windows ISO file.
5. Now, go this way –
Windows 11 > sources
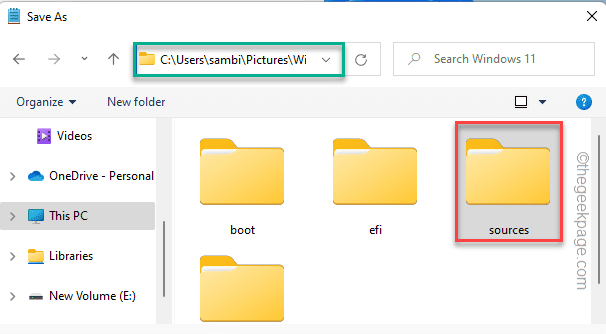
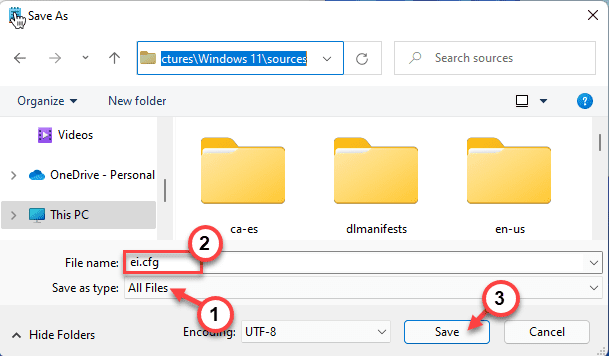
6. Within the sources folder, set “Save as type:” to “All the files“.
7. Then name this configuration file as «ei.cfg«And touch»Save money“.
Once you are done, you can manually run the «setup.exe”File from the extracted folder. You will no longer face the product key validation error message.
Otherwise, you can burn these contents to a new ISO file or USB drive to create a bootable drive and use it to install Windows on your system.
Solution 2 – Clean the Temp folder
If the existing temporary folder contains corrupted files, you may witness this problem.
Step 1: run disk cleanup
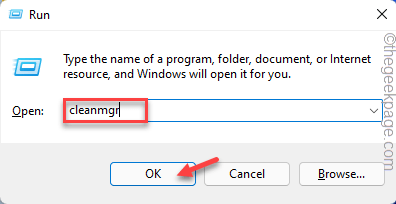
1. First, press the Tecla de Windows + R keys together.
2. Then, writes this code and click «OK“.
cleanmgr
3. When Disk Cleanup opens, choose the option «C:”Unit from the drop-down list.
4. Then tap «OK” to proceed.

Let Windows calculate the amount of junk files present on the drive.
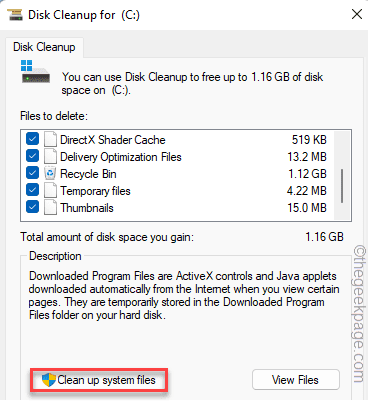
5. After that, tap «Clean system files“.
6. Again, set the «C:”Unit from the list of units.
7. After that, tap «OK“.
8. Now, cheque all the boxes under ‘Files to delete:’.
9. Then tap «OK“.

Now Windows will clean all junk files from the drive.
Step 2 Empty the Temp folder
Next, empty the temporary folder on your system.
1. First, press the Windows key + E keys together.
2. Then, go this way:
C:WindowsTemp
3. After that, Please select all files in the Temp folder.
4. Then, touch the trash can icon to delete all files in the folder.

After that, close File Explorer.
Now, run the installation file on your system.
Solution 3: run setup with your product key
As long as you are running setup with the Media Creation Tool and have a retail key along with you, you can follow this simple solution.
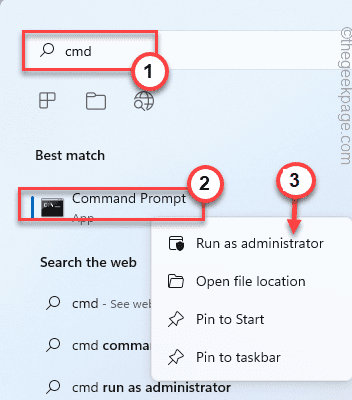
1. At first, press the Windows key and type «cmd“.
2. Then, right-click on the «Symbol of the system«And touch»Execute as an administrator“.
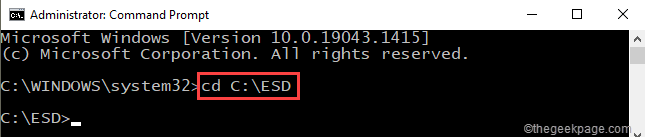
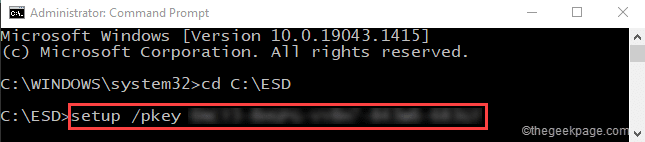
3. When the command prompt terminal appears as administrator, you need to navigate to the ESD folder. Writes this code in the terminal and press Get into.
cd C:ESD
4. To start the setup with the product key, copy take this command and hit Get into.
setup /pkey xxxxx-xxxxx-xxxxx-xxxxx-xxxxx
[Just put in your key in place of “xxxxx-xxxxx-xxxxx-xxxxx-xxxxx” in the code.]
Now, follow the steps to complete the installation process easily.
Solution 4: skip the key validation step
The best way to solve this problem is to skip the key validation step and reactivate your Windows once Windows has successfully installed on your system.
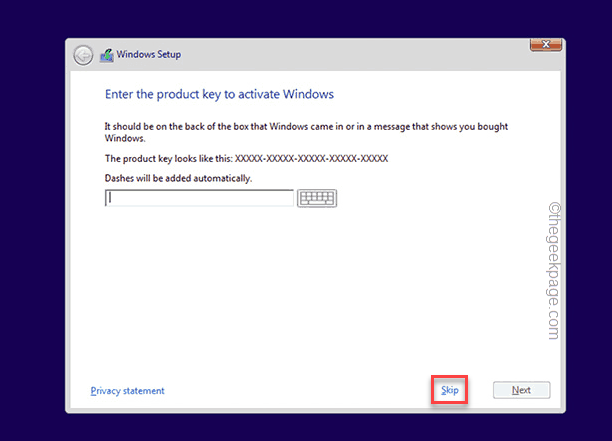
1. Run the installation file on your system.
2. When you get to the key validation step, simply touch the «Jump” The “I don’t have a product key»Option.
Then complete the installation without entering the product key.
3. Once you have installed Windows, you can activate it by following these steps:
System > Activation
4. Now, enter your 25-character Retail Product Key here and Windows will activate.
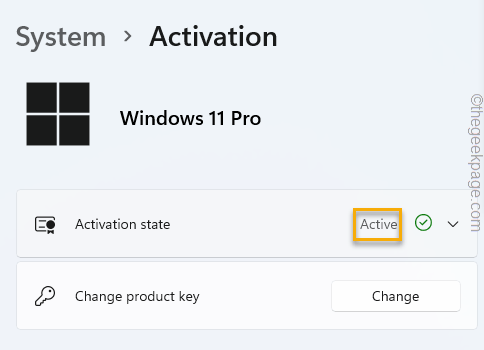
In this way, you can get around the «The installation program could not validate the product key” Error message.
Solution 5: remove the system from the domain
If the system you are trying to install Windows on is a domain-connected system, try these steps.
1. Initially, use an appropriate administrative account to log into the domain controller system.
2. Here, access the Active Directory users.
3. Then, tap on the «Computers“.
A list containing all the system objects will appear in the right pane.
3. Simply select the computer on which you are trying to install Windows and tap «Delete“.
Additional tips –
1. The third-party antivirus you are using may be obstructing the setup process, mainly the product key activation system. So, disable the antivirus on your system.
2. Open the command prompt terminal with administrative rights. Then run this scan there.
sfc /scannow
This scan, if it detects something, automatically corrects it. Then run setup one more time.
Related posts:
 How to access Steam games without an internet connection
  How to view FPS with Xbox Game Bar in Windows 10: Steps Made Easy
  Hacked account? How to check and remedy
  How to make video calls from WhatsApp Web
  How to increase the RAM memory of a desktop or laptop + Tips and Tricks
  How to organize your YouTube subscriptions into categories
+ Tips and Tricks
How to organize your YouTube subscriptions into categories
+ Tips and Tricks


