


Solution: Action Center won’t open in Windows 11
Action Center has become the main control center of the Windows operating system where you can take control of the system from anywhere on your computer. But some Windows 11 users have reported that Action Center won’t open after updating their system’s operating system. If you are also facing this problem, don’t worry. There are some quick solutions to solve this problem on your computer.
Solution 1: restart the File Explorer process
If this happens only once, you can fix it by simply restarting the File Explorer process.
1. At first, press Windows key + E keys together to open File Explorer. Once it opens, minimize it.
2. Then, right-click on the Windows icon on the taskbar and tap “Task Manager”To access the Task Manager on your computer.
4. Once the Task Manager opens, right-click on the «Windows Explorer«Process and click»Restart“To restart the process.
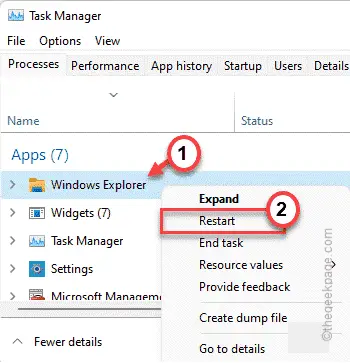
The taskbar and desktop will turn white and will not respond for a few seconds. But once everything is back to normal, try using the Action Center.
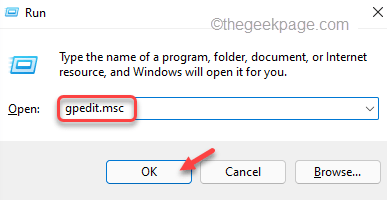
Solution 2: use the GPO
[FOR PRO & BUSINESS EDITIONS ONLY]
If the Action Center is locked with your administrator’s Group Policy settings, you will not be able to access it.
1. At first, press the Tecla de Windows + R keys together.
2. Then write «gpedit.msc“And click”OK“.
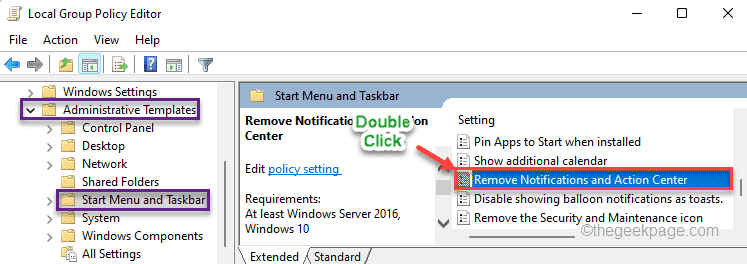
3. When the Local Group Policy Editor opens, go like this ~
User Configuration > Administrative Templates > Start Menu and Taskbar
4. On the right side, you will find the «Delete notifications and action center”Policy configuration.
5. So, double click in politics to adjust it.
6. Now, tap on the «Disabled”To disable this policy.
7. Finally, touch «Request” and “OK”To save the changes.
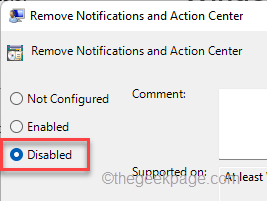
After that, close the Group Policy Editor screen on your computer. Then restart your computer for these changes to take effect. After restarting the device, you will use the Action Center without any further problems.
Solution 3: use the registry
If the group policy solution doesn’t work for you, try using this registry trick on your system.
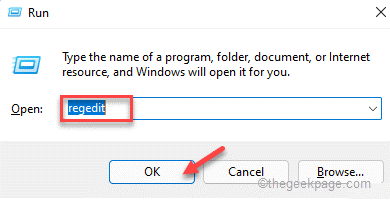
1. At first, right-click on the Windows icon and tap «To run“.
2. Then write «regedit“And click”OK”To access the Registry Editor.
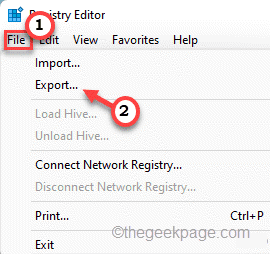
Warning – Sometimes these registry edits can crash your entire system. In that case, a simple registry backup can save your system. So, follow this simple step to create a registry backup.
When Registry Editor opens, click «Proceedings“. Then touch «To exportTo create a new backup of the registry on your system.
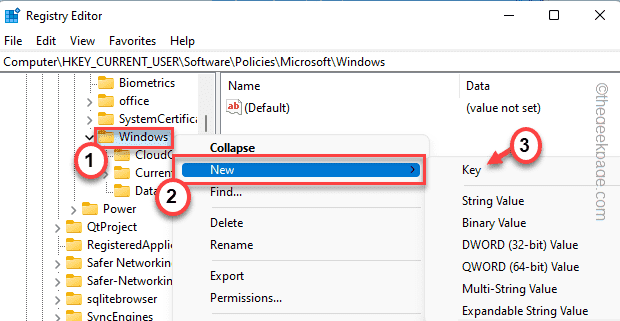
3. On the left side, expand the left side like this ~
ComputerHKEY_CURRENT_USERSoftwarePoliciesMicrosoftWindows
4. Now on the left side, right click on «Windows” wrench.
5. Then click on «New> ”Y“WrenchSimultaneously to create a new subkey.
6. Name this subkey as «Explorer“.
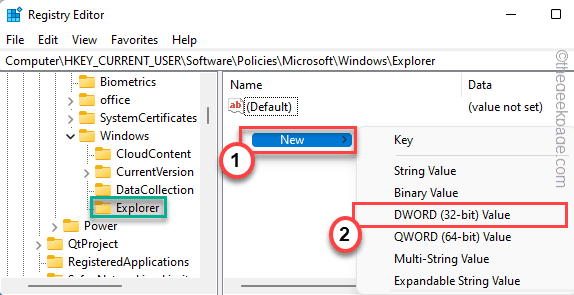
7. On the right side, right-click and tap «New>“And then click”Valor DWORD (32 bits)”To create a new value.
8. Rename this new value as «DisableNotificationCenter“.
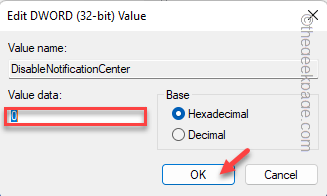
9. Now double click on «DisableNotificationCenter”For further editing.
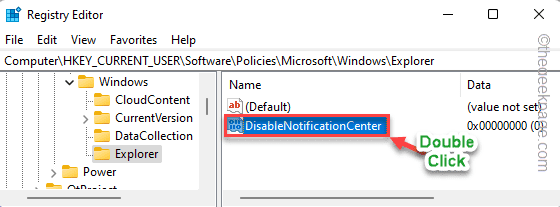
10. Set the value to «0“.
11. Then click on «OK”To save this change.
After completing all these steps, close the Registry Editor screen. Later, restart your computer for these changes to take effect.
Upon restart, Action Center will start behaving normally.
Solution 4: run PowerShell commands
The Action Center may be damaged during the system update.
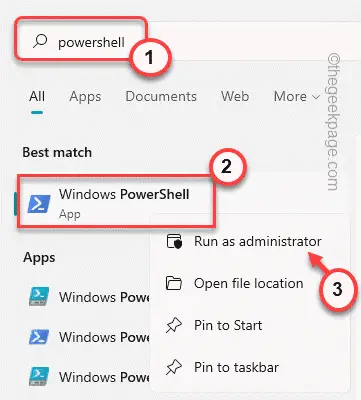
1. At first, press the Windows key and type «potencia Shell”In the search box.
2. Then, right-click on the «Windows PowerShell“And click”Execute as an administrator”To open the terminal with administrative rights.
3. Once the PowerShell terminal appears, writes O copy get these commands one by one and press Get into to run them sequentially.
Get-AppxPackage Microsoft.Windows.ShellExperienceHost | foreach {Add-AppxPackage -register "$($_.InstallLocation)appxmanifest.xml" -DisableDevelopmentMode}

Get-AppXPackage | Foreach {Add-AppxPackage -DisableDevelopmentMode -Register "$($_.InstallLocation)AppXManifest.xml"}
After running these commands, close the PowerShell terminal screen and restart the system.
This should fix the Action Center on your Windows 11 machine.
Solution 5: rename the UsrClass.dat file
The CLASS per user storage file may become corrupted while upgrading the system.
1. Press the Tecla de Windows + R keys together.
2. Now, catch this location and click «OK“.
%localappdata%MicrosoftWindows
3. Now scroll down to find the «UsrClass.dat ”at the bottom of the folder.
[
If you can’t find the file, it may be because it is hidden. You have to unhide all the folders/files.
1. After opening the File Explorer, tap on the three-dot menu.
2. Then tap on “Options” from the drop-down list.
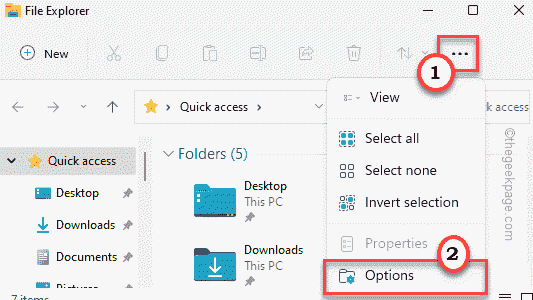
3. Now, go to the “View” tab.
5. Then, click on the radio button beside the “Show hidden files, folders, and drives” option.

6. Finally, tap on “Apply” and “OK“.
Now, go back to the folder and follow the next steps.
]
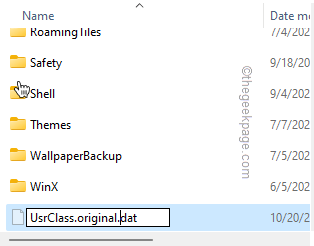
4. Now, right-click on «UsrClass.dat “and touch the”Rename“Icon.
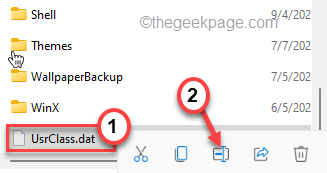
5. Set the new name as «UsrClass.original.dat“.
Close the File Explorer window. Restart your computer and try to access the Action Center.
Solution 6: run a SFC, DISM scan
If nothing has worked so far, try running a SFC and DISM scan on your computer.
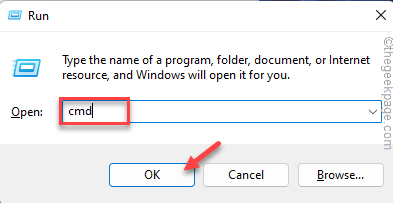
1. At first, press the Tecla de Windows + R keys together.
2. Then write «cmd«And press Ctrl + Shift + Enter keys together to access the terminal with administrative rights.
3. At the beginning, writes this command in terminal and press Get into to run the DISM check.
DISM.exe /Online /Cleanup-image /Restorehealth
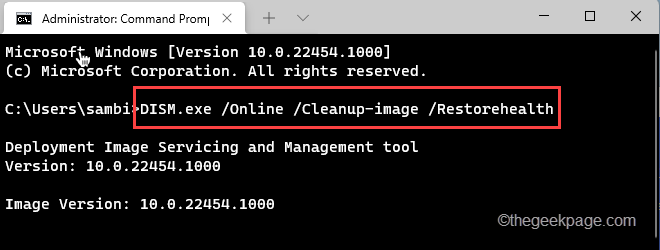
Let Windows complete the DISM scan.
3. After running the DISM scan, catch this command and hit Get into to run an SFC scan.
sfc /scannow
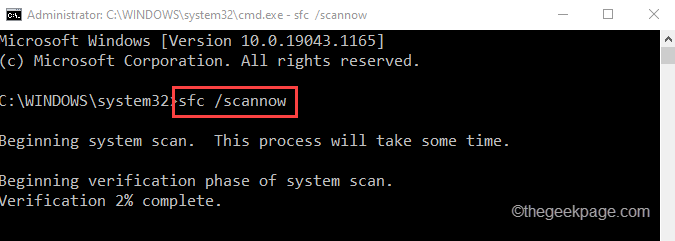
Once the scanning process reaches 100%, close the command prompt and reboot your system.
Your problem related to the Action Center will be solved for sure.
Related posts:
 How to access Steam games without an internet connection
  How to view FPS with Xbox Game Bar in Windows 10: Steps Made Easy
  Hacked account? How to check and remedy
  How to make video calls from WhatsApp Web
  How to increase the RAM memory of a desktop or laptop + Tips and Tricks
  How to organize your YouTube subscriptions into categories
+ Tips and Tricks
How to organize your YouTube subscriptions into categories
+ Tips and Tricks


