


Windows Installer service could not be accessed Error in Windows 11 and 10
Many Windows users have encountered “Windows Install Service could not be accessed” message while trying to install applications on their machine and have been unable to complete the process. This can be quite frustrating for users who are eagerly waiting to start using that app.
Possible reasons for this error when trying to install any software are listed below.
COMMERCIAL
- Windows Installer service disabled
- Using the previous version of Windows Installer
- The Windows Setup service was installed incorrectly.
- The previous version of the app was not uninstalled.
After summarizing all the factors mentioned above, we have compiled some of the fixes in this post that can help users to fix this issue and install the program without difficulty.
Solution 1 – Enable Windows Installer Service
Windows Installation Service is a tool/program in the Windows system that helps to install the software or application in an architectural way for convenience. If this service is disabled, then there is a higher chance that users will get such error while trying to install any application on their system.
using the easy Steps outlined here, you mayo enable the Windows installer Service on you PC 2 ways.
Using the services window
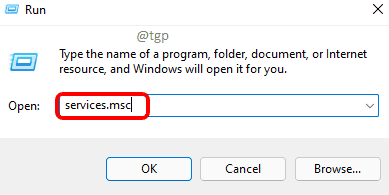
Step 1: Press Windows + R keys together on your keyboard to open the Run command box
Step 2: Write services.msc in the run command box and press the button Get into key to open the Services window.
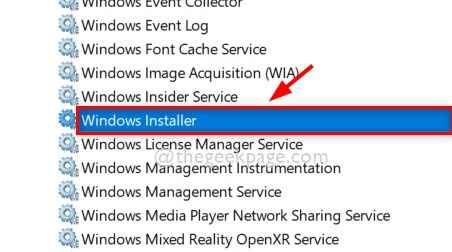
Step 3 – In the Services window, find the windows installer service and double-click it to open it.
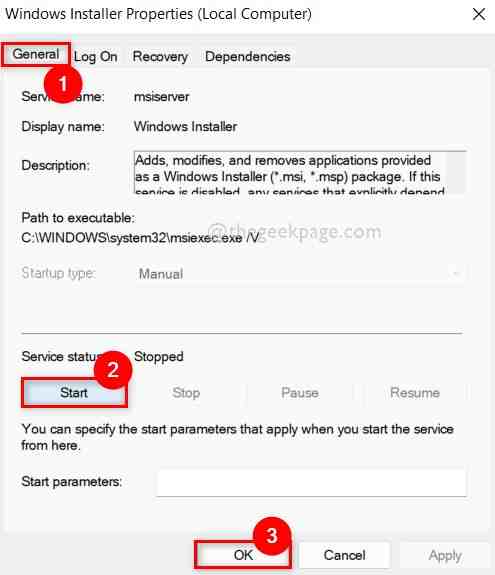
Step 4 – In the Properties window for this service, make sure you are in the General tab.
Step 5: Then click on the Start and wait for some time until the service starts.
Step 6: Finally, click OK to accept the changes and close the window as shown in the following screenshot.
COMMERCIAL
Step 7 – Close the Services window.
Now try to install any app and check if any error occurs.
I hope this has solved this problem.
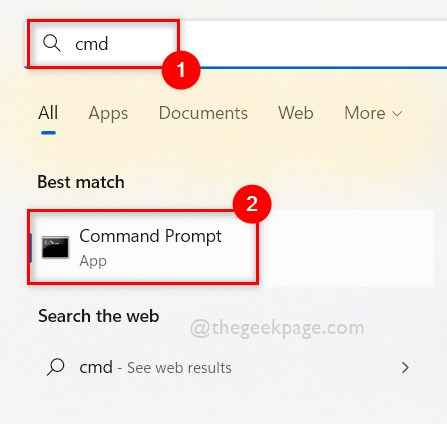
Using the command prompt
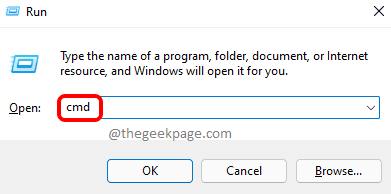
Step 1: Press Windows + R keys together to open the run command box
Step 2: Write cmd in the run command box and press CTRL + SHIFT + ENTER keys together to open the Symbol of the system as a management.
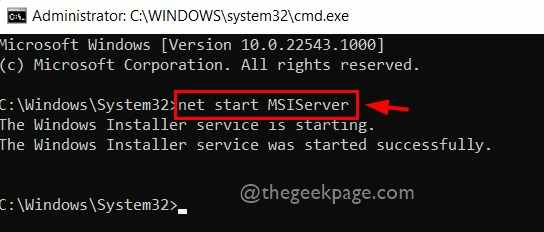
Step 3 – At the command prompt, type Net Start MSIServer and hit the Get into key to run this command to start the Windows Setup service as shown in the following screenshot.
Step 4 – Once done, close the Command Prompt window.
Now check if the error occurs while trying to install the software on your system.
I hope this has solved your problem.
COMMERCIAL
Solution 2 – Re-register the Windows Setup service
To resolve this issue, users can try to re-register the Windows Installer service on their system, which will be fixed if any settings are changed. Follow the steps below to re-register the Windows Setup service.
Step 1: Press the Windows key on your keyboard and type cmd.
Step 2: Then select Symbol of the system from the search results as shown below.
Step 3 – At the command prompt, run the following commands one by one as shown in the following screenshot.
%windir%system32msiexec.exe /unregister
%windir%system32msiexec.exe /regserver
%windir%syswow64msiexec.exe /unregister
%windir%syswow64msiexec.exe /regserver

Step 4 – After re-registering the Windows Installer service on your system, close the Command Prompt window.
Now check if the issue is resolved.
Fix 3 – Rename the Extra msiexec file in the System 32 folder and restart the Windows Installer service
Sometimes we are unaware that besides the actual msiexec.exe file, there is another msiexec file that has no extension and no data. So this might create a conflict in choosing the Windows msiexec file and thus users get the error while installing an application.
Therefore, it is better to rename another msiexec file and restart the Windows installation service on the system.
Follow the steps given below which will guide you to resolve this issue.
Step 1: Go to C:WINDOWSSystem32 and locate the msiexec file without extension and without data.
Step 2: Rename it to msiexec.OLD and close the System32 folder.
NOTE: If there is no msiexec file with no extension and no data, skip the previous steps and continue from step 3.
COMMERCIAL
Step 3: Open Services window pressing Earn + R keys together and typing services.msc and hitting Get into wrench.
Step 4: In the Services window, find and the right button of the mouse on windows installer from the Services list.
Step 5: Select Restart from the context menu as shown below.
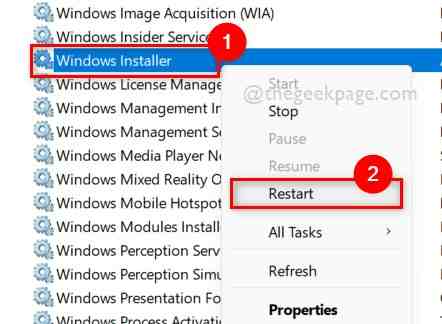
Step 6 – Wait until the Windows Installer service restarts.
Step 7: Then close the Services window.
Now check if the problem still appears.
Solution 4 – Remove the previous version of the software you are trying to install
When trying to install a software with the latest version, the error “Cannot access Windows Installer” appears if there is still any previous version of the software on the system. If you are upgrading software, then this conflict would not have arisen. But not in case of installing a software.
Therefore, we recommend users to uninstall the software with the old version on the system and then try to install the latest version.
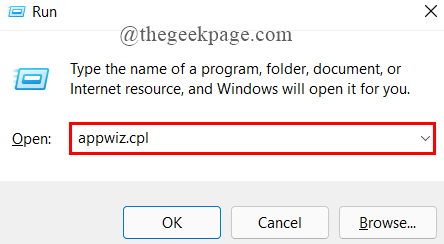
Step 1: Press Windows + R keys together on your keyboard to open Run command box
Step 2: Write appwiz.cpl in the run box and press the button Get into key to open installed apps page as shown below.
COMMERCIAL
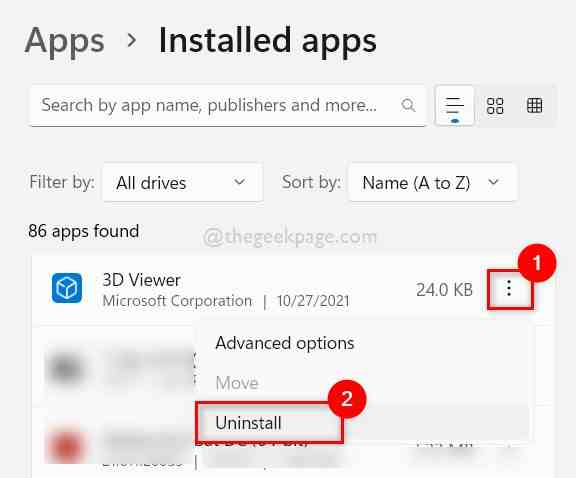
Step 3 – Next, find the software in the list of applications and click three vertical dots (Show more options) as shown.
Step 4: Click uninstall in the drop-down menu as shown in the following screenshot.
Step 5 – Follow the instructions on the screen to uninstall the software you want.
Step 6 – Close the installed apps page.
Now try to install the software with a newer version on your system and check if the problem still occurs.
I hope this has solved the problem.
That’s all guys! I hope this post has been informative.
Let us know in the comments section below.
Thank you for reading!
Related posts:
 How to access Steam games without an internet connection
  How to view FPS with Xbox Game Bar in Windows 10: Steps Made Easy
  Hacked account? How to check and remedy
  How to make video calls from WhatsApp Web
  How to increase the RAM memory of a desktop or laptop + Tips and Tricks
  How to organize your YouTube subscriptions into categories
+ Tips and Tricks
How to organize your YouTube subscriptions into categories
+ Tips and Tricks


