


7 Ways to Repair Windows 11 and Fix Corrupt Files
If you recently upgraded to Windows 11, you must be happy to experience the new sleeker interface, its consistent operation, durability, and also the fact that the operating system focuses on security. However, just like the other versions of the operating system, Windows 11 is also not flawless. The new OS is equally prone to issues like the others, for example crashing, slow loading, won’t boot normally, this PC can’t run Windows 11 issue or sometimes black screen of death.
This may lead to corrupted files or it may end up affecting the registry files causing further complications. While this can be annoying, it is quite common with a new operating system. Here is a list of 7 ways to fix Windows 11 and any damaged files.
*Note – Before proceeding with the repair solutions, make sure to create a backup of all your important data because Windows 11 repair may lead to data loss. To do this, follow the instructions below (if your computer won’t turn on and you need access to the BIOS):
Step 1: Create a Windows 11 installation media using a USB drive.
Step 2: Once done, connect the bootable media to your PC and by entering BIOS setup (restart your PC and press F2 or related key depending on your PC manufacturer to boot BIOS).
Step 3: Next, set the boot option to Removable Devices or CD-ROM drive in BIOS and press F10 on your keyboard to save changes and exit.
Step 4 – While booting your PC with the USB drive, you can use third-party software to recover your lost files.
Once you have successfully recovered your lost data, you can continue with the methods below to possibly repair Windows 11 and repair any corrupted files.
Method 1: Run Startup Repair
When your Windows 11 won’t boot, the first method you can try is to run Startup Repair. Let’s see how:
Step 1 – Connect the bootable media you created earlier for Windows 11 to your PC.
Step 2: Now, restart your PC and use the Windows 11 installation media to boot your system.
Step 3: When you see the Windows installation screen, click the repair your computer option at the bottom, without delay.
Step 4: Next, it will take you to advanced recovery options.
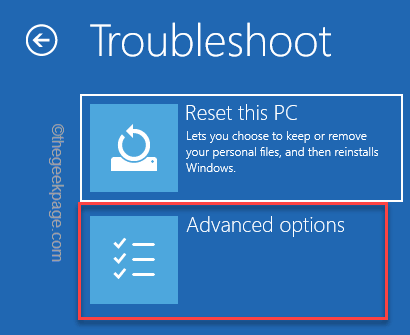
Here, on the Choose an option screen, click Solve problems.
Step 5 – Now on the troubleshooting screen choose Advanced Options of the list.
Step 6 – On the advanced options screen, select initial repair.
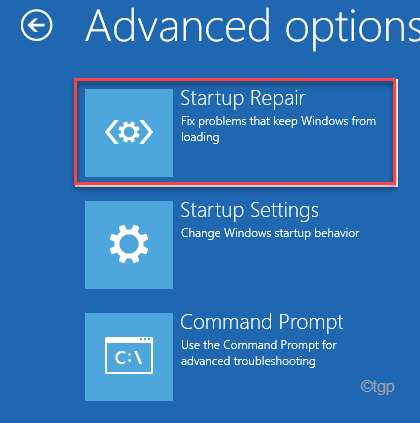
Now the startup repair process will start and start detecting any issues on your PC. If any are found, it will automatically apply the fix.
Once done, your Windows 11 PC should restart automatically and the problem should be fixed.
Method 2: Run SFC to repair system files
You may encounter Windows 11 issues with corrupted or missing files. In such a case, you can run the system file checker tool to detect any corrupted files and repair them. Let’s see how:
Step 1 – Just Press the Button Earn + R shortcut keys to start To run I send.
Step 2 – When the Run command box opens, type cmd.
At the same time, press the button Ctrl + Mayús + Intro keys simultaneously on your keyboard.
This will open command prompt windows with administrator rights.
Step 3: The elevated Command Prompt window will open.
Here, type the following command and hit the Enter key.
SFC / SCANNOW
The scan takes a bit longer to process, so wait until it’s done and once it’s done. The tool will automatically detect any damaged or missing files and repair them on the spot.
Now restart your PC to check if the Windows 11 issue is resolved.
Method 3 – Use DISM to repair system files
If the above method fails, you can try running DISM scan. This scan also takes more time, so please wait patiently for it to finish. Follow the instructions below to run the DISM scan:
Step 1: Press the Earn + R at the same time, on your keyboard and on the To run the command window will appear.
Step 2 – In the search bar of the Run command, type cmd and at the same time press the Ctrl + Mayús + Intro keys together on your keyboard to open the elevated command prompt.
Step 3: The command prompt window will open in administrator mode.
Here, type the following command and hit the Enter key to start running the DISN scan:
DISM /Online /Cleanup-Image /RestoreHealth
Now, wait for the scan to finish as it takes a while.
Once you are done, restart your PC and your Windows 11 issue should be resolved.
Method 4: Perform System Restore
Sometimes when most of the methods don’t work, you can also try running a system restore which can help your PC back to a previous state when it was working fine. For example, if your Windows 11 PC stopped working on March 3, and you have a system restore point created for February 27, you can perform a system restore and take your PC back to February 27, when it was running. That is how:
Step 1: Navigate to the Start buttonright click on it and click To run.
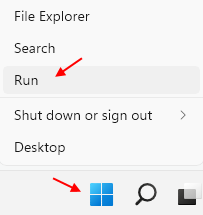
Step 2: This will open the Run command window.
In the text field, type rstrui and press enter
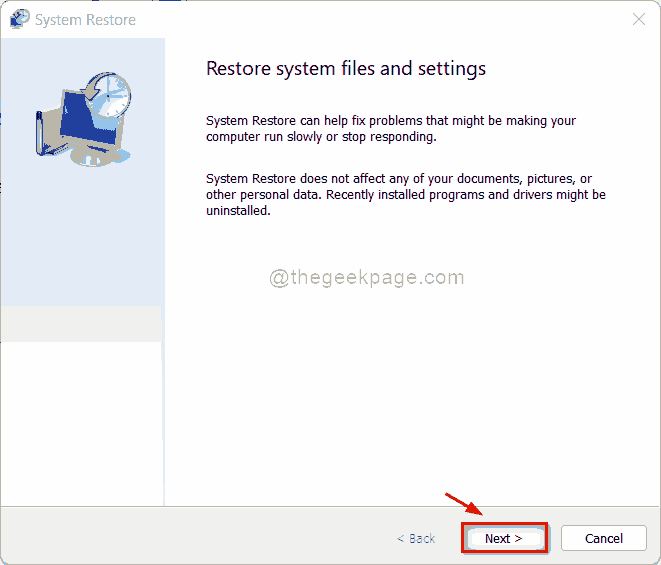
This will open the system restore window.
Step 3: Next, in the System Restore window, click on Next.
Step 4: In the next window, from the list, select the restore point want to go back and click Next.
Now, sit back and wait for the system restore process to finish. It is a long process and therefore would take time.
Once it’s done, it will automatically restart to the previous selected date and state. Your Windows 11 PC should be up and running now.
*Note – Here’s how to create a system restore point in Windows 11.
Method 5: Restart your PC
If you don’t want to perform system restore, you can try resetting your Windows 11 PC, which may help to fix the issue you are facing. There is nothing to worry about, as you can keep your personal files or delete them, while Windows is reinstalled.
Follow the instructions below to reset your PC:
Step 1: Hold the win + me shortcut keys together on your keyboard and then release them to open the Settings window.
Step 2 – In the Settings app, go to the left side and click System.
Step 3: Next, navigate to the right side, scroll down a bit and click on the Recovery .

Step 4: Now on the next screen, scroll to the right side and under the Recovery Options section, go to Restart is personal computer and click the Reset PC button next to it.
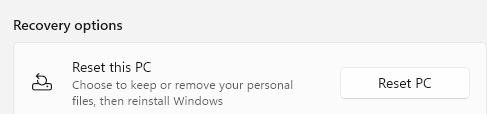
Step 5: Now you will see a new window in blue – Restart this PC.
Here, you can select Keep my files or Delete everything.
Step 6: Once you have made your choice, you will see a popup confirming that your apps will be removed.
Here, click Next to continue.
Step 7 – Hit Reset on the next screen to confirm the action and now Windows 11 will be reinstalled.
Once this is done, you will have a brand new Windows 11 without any problem.
Method 6 – Check for Windows updates
However, if you still don’t want to perform a system restore or reboot your PC, you can check if there are any pending Windows updates that might be causing the problem. In such a case, updating your Windows with the latest available update may help fix the problem. Here’s how to check for Windows updates:
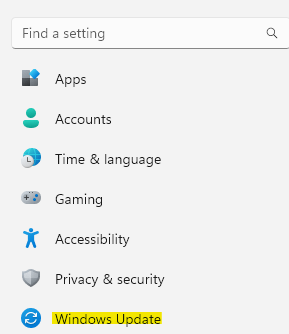
Step 1 – Navigate to the Start button (the four blue squares), right-click on it and select Settings.
Step 2: This will open the Settings application
Here on the left side of the panel, scroll down and click windows refresh.
Step 3: Now, go to the right side of the window and click on the Search for updates button.

Step 4 – If it shows any update available, it will start downloading and installing automatically.
You will now see a message saying that you can restart your PC now or later to finish the installation. You can select as per your convenience.
Once the installation is complete, your PC will reboot and the problem will be gone.
Method 7: Run System Maintenance Troubleshooter
Alternatively, you can also choose to run the system maintenance troubleshooter which scans your entire system for errors or corrupted files and fixes them automatically. This can be accessed through the Control Panel Troubleshooter. Let’s see how:
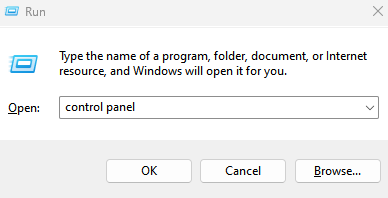
Step 1: Press the Earn + R hotkeys to open the Run command search box.
Step 2: In the search bar, type Control Panel and press Enter.
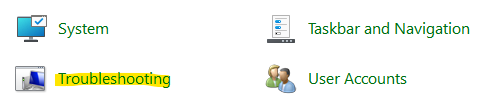
Step 3: Next, in the Control Panel window that opens, go to the top right corner and next to View By, click to expand the dropdown menu and select big icons.

Now, from the list, select Problem solving.
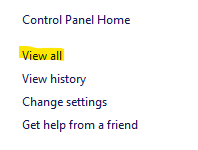
Step 4: In the next window, click See everything on the left side of the panel.
Step 5 – Wait a few seconds and the All Categories page will open with the list of different troubleshooters.
now search System maintenance in the list and click on it.

Step 6: This will open the System Maintenance window.
Click Next to proceed.
*Note – It may ask you for administrator permissions. Simply select “Try to troubleshoot as an administrator.”
The troubleshooter will continue to search for any problems. If any are found, it will list the solution and you can proceed to fix the problem.
Once done, you can reboot your Windows 11 PC and the problem should be fixed now.
Related posts:
 How to access Steam games without an internet connection
  How to view FPS with Xbox Game Bar in Windows 10: Steps Made Easy
  Hacked account? How to check and remedy
  How to make video calls from WhatsApp Web
  How to increase the RAM memory of a desktop or laptop + Tips and Tricks
  How to organize your YouTube subscriptions into categories
+ Tips and Tricks
How to organize your YouTube subscriptions into categories
+ Tips and Tricks


