


How to Activate Virtualization on a PC with ‘BIOS’ or without Them? – Do it like this
–
Virtualization allows a processor to behave like multiple independent CPUs. Thus, increases the efficiency and power of the CPU. If this feature is disabled on your computer, it is important that you know how to activate virtualization on a PC with or without ‘BIOS’. Do it like this as we show you in this interesting tutorial.
How to check if a PC is compatible with virtualization?
It is possible to check if a PC with an Intel processor supports virtualization. To do so, press the ‘Win + S’ keys to access the search bar and type ‘System Information’. Enter the processor number and access the website of intel product specifications.
Next, enter the processor number in the search box located in the upper right area of the window. In the ‘Advanced Technologies’ section locate the option ‘Intel Virtualization Technology (VT-x)’ in order to check if your computer supports virtualization.
Using .exe extensions
Also, you can check if a PC supports virtualization using .exe extensions. You can check if your Intel-based PC supports virtualization using a free tool that you can download from Intel’s official website to download an installation file on your computer.
Once you install this utility on your computer, run it so that the tool can detect the state of your processor and then wait a few seconds for a report to be issued. If it shows the word ‘Yes’, it means that your computer supports virtualization technology.
The above procedure is similar to that required for check amd processors as its official website also has a detection utility. In this case, when downloading and installing the ‘System Compatibility Check’ .exe extension you might see a report with the message ‘This system supports Hyper-V’.
What should you do to enable virtualization of your PC in ‘BIOS’?
It is possible to activate the virtualization of your PC in ‘BIOS’. To do so, you can use the ‘F2’ or ‘DEL’ keys to access the BIOS depending on the motherboard type that you own. Other computers require the use of the ‘Esc’ or ‘F1’ keys. Therefore, it is recommended that you verify which is the key to be able to access the BIOS of your PC.
It is important to note that the graphical interface of each BIOS is different. Indeed, you need to locate the ‘VT-x’ section or look for the ‘Enable virtualization’ option among all the sections that the BIOS of your motherboard presents. In the same way, happens for him UEFI menu access where you will need to enable ‘Intel VT-x’.
With the keys ‘F2’ or ‘DEL’
You can access your computer’s BIOS with the ‘F2’ or ‘DEL’ keys. To do this process, restart your PC and press one of these keys several times in order to open an interface with which you can turn on virtualization. Look for the ‘Advanced BIOS Features’ section, in ‘Virtualization Technology’ choose ‘Enabled’ and press ‘F10’ to save the changes.

You can enable virtualization on a PC with a UEFI-compliant BIOS. Open settings and under ‘Update & security’ select ‘Recovery’. Click ‘Restart Now’ and choose ‘Troubleshoot’. Press ‘Advanced Options’ and UEFI firmware settings. Then press ‘Restart’ to enter UEFI mode.
How to enable virtualization on other motherboard brands?
It is possible to enable virtualization on other motherboard brands that require specific steps to access the BIOS on both Lenovo and ‘HP’ computers. Remember that the graphical interface of the BIOS differs depending on the motherboard. For this, you must search between the sections to find the virtualization option.
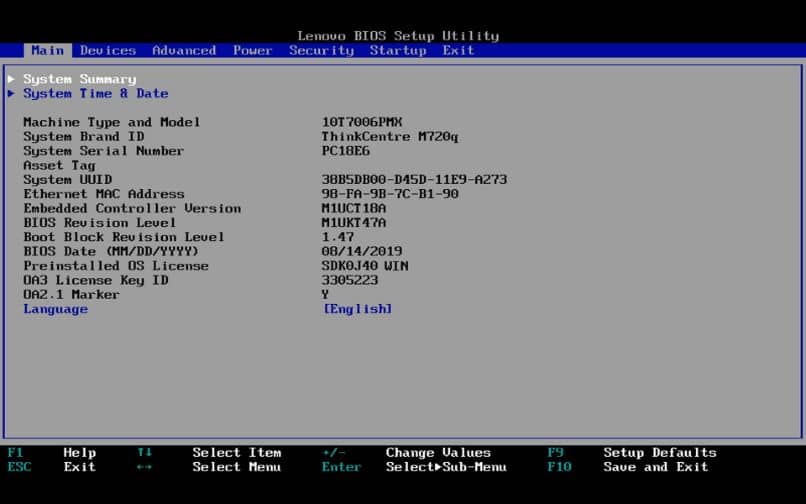
Lenovo computers or ‘HP’
To enter the BIOS on Lenovo computers, you will need to restart the computer and repeatedly press the ‘F1’ key to access the BIOS. BIOS setup utility. Then, locate the ‘Security’ section and in Virtualization’ look for ‘Intel ( R ) Virtualization Technology’ mark ‘Enabled’. Repeat this step on the ‘Intel ( R ) VT-d Feature’ option.
If your Lenovo PC has an AMD processor, go to the ‘Security’ section and in ‘Virtualization’ look for the ‘AMD V (TM) Technology’ option to check ‘Enabled’. In this way, you will activate the virtualization on your Lenovo computer. Finally, press the ‘F10’ key and confirm the operation with the ‘Yes’ option in order to apply the changes.
On an HP desktop, repeatedly press the ‘Esc’ key to open the BIOS setup utility right after you restart your PC. Find the section ‘System configuration’ and choose the ‘Virtualization Technology’ option and press ‘Enter’. Check ‘Enabled’ and press the ‘F10’ key to save the changes.
What problems can you have after activating virtualization?
After you turn on virtualization, you may experience some issues such as reduced performance of your computer due to a virtualization overhead of the central processing unit, that is, an increase in the use of the CPU and this could affect the behavior of your computer at a general level.
Also, when starting virtual machines increase the use of resources. Therefore, if you do not have a hard disk that has flash-based memory or you have insufficient RAM memory for the consumption that the virtualization process entails, your computer will present a notable reduction in performance.
It is important to note that virtualization can cause problems with games because the simulated GPU is only suitable for the management basic 3D graphics which requires the graphical interface of the operating system. For this reason, it is not recommended that you enable virtualization if you are looking to optimize gaming performance on your PC.
Related posts:
 How to access Steam games without an internet connection
  How to view FPS with Xbox Game Bar in Windows 10: Steps Made Easy
  Hacked account? How to check and remedy
  How to make video calls from WhatsApp Web
  How to increase the RAM memory of a desktop or laptop + Tips and Tricks
  How to organize your YouTube subscriptions into categories
+ Tips and Tricks
How to organize your YouTube subscriptions into categories
+ Tips and Tricks


