


How to enable and connect to remote desktop in Windows 11/10
Remote Desktop is an important Windows-compatible feature that allows users to connect to a remote computer and even control the remote computer over the Internet. However, to enable this function, it is necessary to make certain configuration settings on your PC and on the remote PC.
To use and control Remote Desktop, you must do three things:
- Enable remote desktop function
- Connect using the remote desktop client
- Allow remote connections on the firewall.
Only when all three settings have been made on your PC will remote desktop be accessible. Note that some settings must also be done on the remote desktop. In this article, we will focus on the settings that need to be done on your PC.
How to enable remote desktop function in Windows 11
Method 1: from settings
Step 1: Open the Run dialog with the keys Windows + R.
Step 2: Type the following command and press the Get into wrench.
ms-settings:remotedesktop
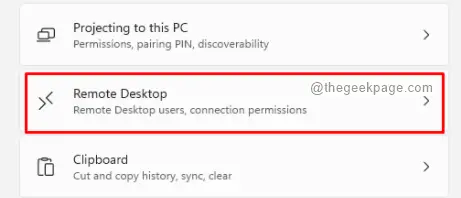
Step 3: In the window that appears, click Remote Desktop As shown below.
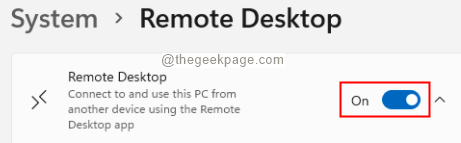
Step 4: On the next screen, move the button to activate the Remote Desktop function.
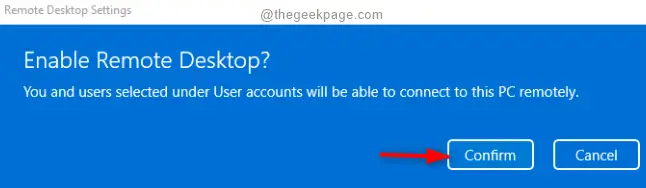
Step 5: In the Enable Remote Desktop pop-up that appears, click the Confirm button.
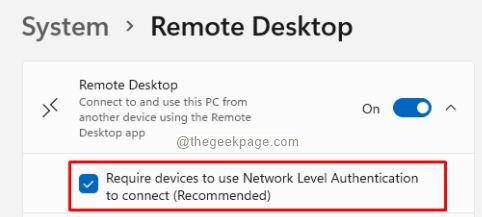
Step 6: Now, check the option Require devices to use network-level authentication to connect (recommended)
Step 7: Reopen the Run dialog.
Step 8: Type the following command and press Get into.
control.exe /name Microsoft.NetworkAndSharingCenter
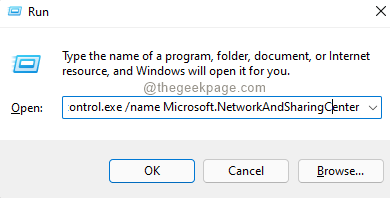
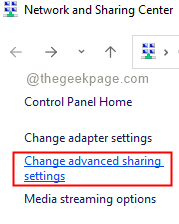
Step 9: In the windows that appear, from the left side, click Change advanced sharing settings.
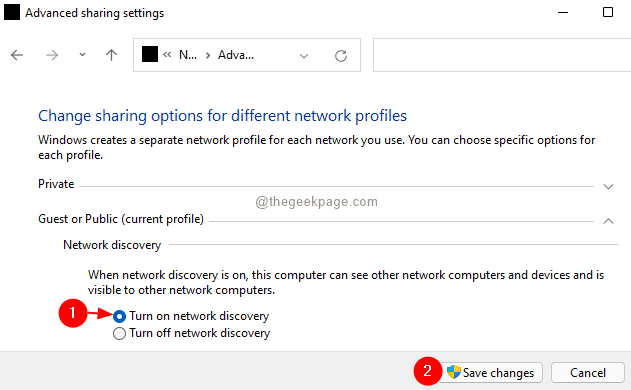
Step 10: In the window that appears, below the Network detection section, click Turn on network discovery.
Step 11: click Save Changes.
Method 2: from the control panel
Step 1: Open the Run dialog box with Windows + R keys.
Step 2: In the opening window, type the following command and press the Get into wrench.
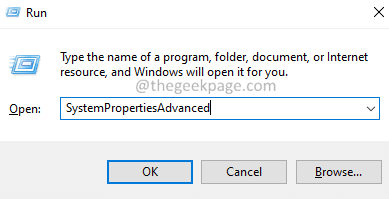
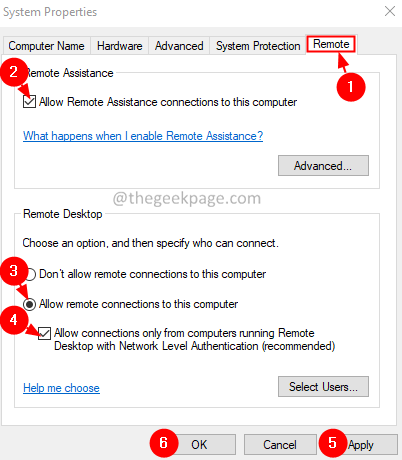
Step 3: in the System properties window that opens, click the Remote tab.
Step 4: Under the Remote assistance section, see Allow Remote Assistance connections to this computer option.
Step 5: In the Remote Desktop section, Allow remote connections to this computer.
Paso 6: Cheque the option Allow connections only from computers running Remote Desktop with network level authentication (recommended).
Step 7: click Request and then click OK.
With these simple changes, a remote desktop will be enabled on your system.
Method 3: from the command line
This method is especially useful when you are writing a script that requires you to enable remote desktop a couple of times.
Step 1: Open the Run With dialog box Windows + R.
Step 2: In the Run dialog window, type cmd and keep the keys Ctrl + Shift + Enter. This opens the elevated command prompt.
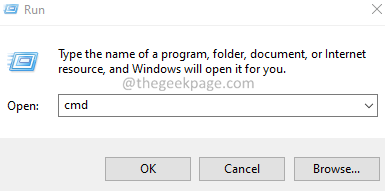
Step 3: In the UAC window that appears, click Yes.
Step 4: To enable remote desktop, we must run the following command at the command prompt.
reg add "HKEY_LOCAL_MACHINESYSTEMCurrentControlSetControlTerminal Server" /v fDenyTSConnections /t REG_DWORD /d 0 /f
Method 3: from PowerShell
This method is especially useful when you are writing a script that requires you to enable remote desktop a couple of times.
Step 1: Open the Run With dialog box Windows + R.
Step 2: In the Run dialog window, type potencia Shell and keep the keys Ctrl + Shift + Enter. This opens the Elevated PowerShell window
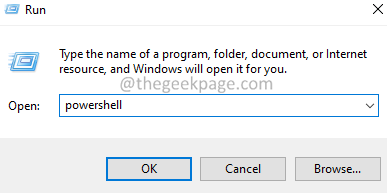
Step 3: In the UAC window that appears, click Yes.
Step 4: To enable Remote Desktop, we must run the following command in the Elevated PowerShell window.
Set-ItemProperty -Path 'HKLM:SystemCurrentControlSetControlTerminal Server'-name "fDenyTSConnections" -Value 0
That is all.
How to connect using the remote desktop client in Windows 11
Method 1: From Remote Desktop Legacy App
Step 1: Open the Run dialog box.
Step 2: type the command mstsc and hit Get into.
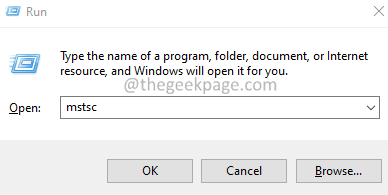
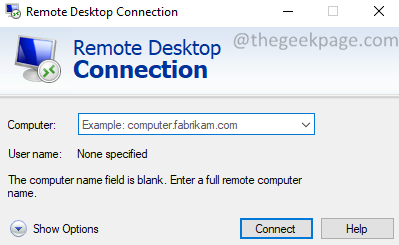
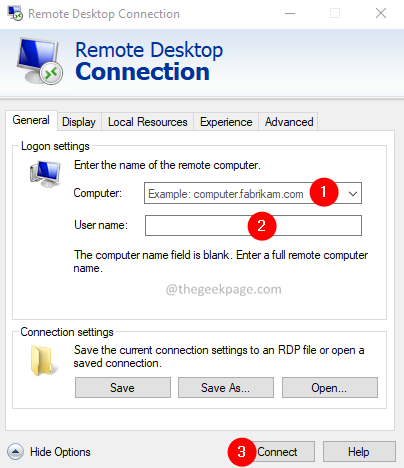
Step 3: In the Remote Desktop Connection window, enter the name of your computer and click the Connect button.
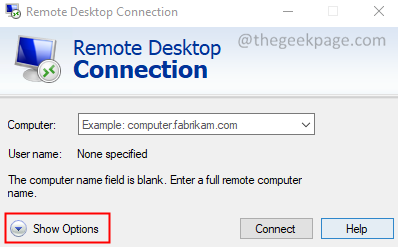
Step 4: If you want to enter the username, click the Show Options button.
Step 5: Now, enter the username and connect.
Method 2: Microsoft Remote Desktop App
Step 1: Visit the Microsoft Store and download the Microsoft Remote Desktop App.
Step 2: Download, install and run the application.
Step 3: Open the remote desktop application.
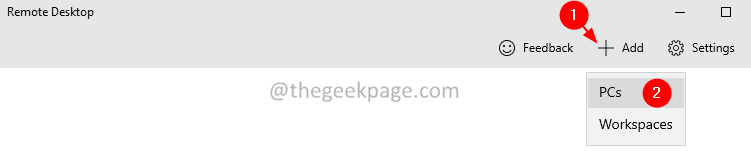
Step 4: Click the + symbol in the upper right corner of the window and choose PC from the drop-down menu.
Step 4: In the opening window, enter the computer name and click Save money.
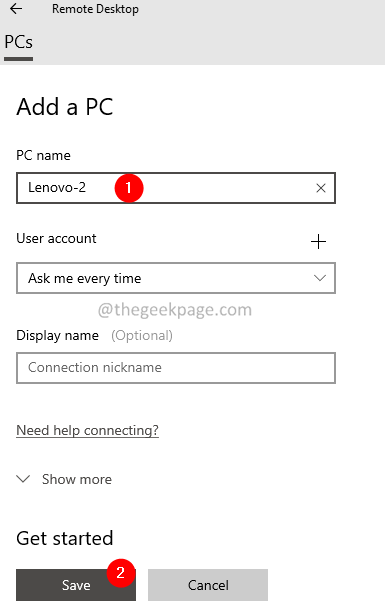
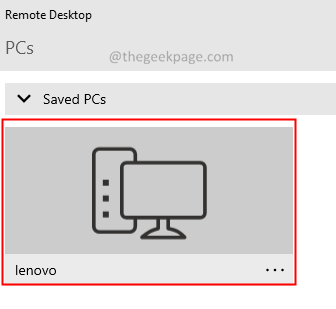
Step 5: Click on the icon corresponding to the name of the PC to start the connection.
That’s it and you will be connected. Any third party software can also be used for the remote desktop connection.
How to allow remote connections on the firewall
Method 1: from firewall settings
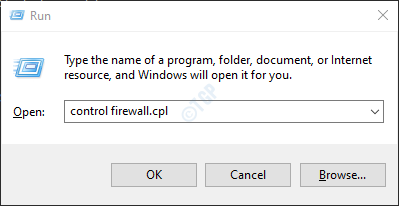
Step 1: open the Run window with the keys Windows + R
Step 2: Write control firewall.cpland hit Get into
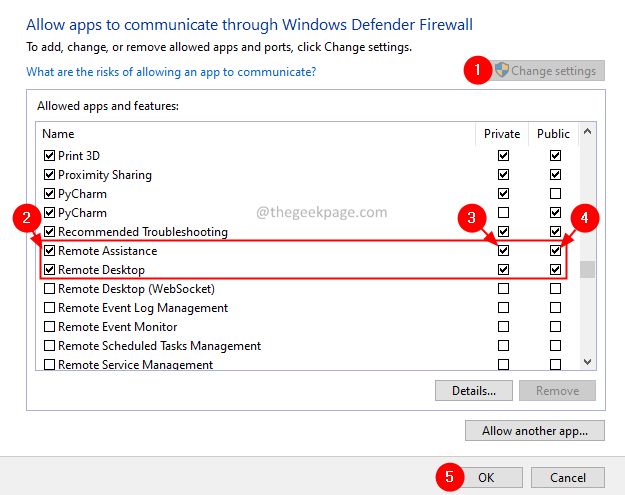
Step 3: On the left side menu, click Allow an app or feature through Windows Defender Firewall
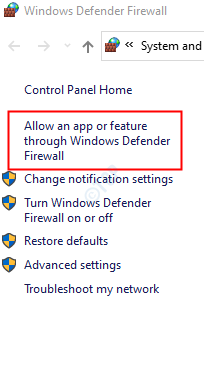
Step 4: In the Allowed Applications window, locate Remote Desktop and Remote Desktop (WebSocket) and make sure it is Checked. Make sure it is checked for both Public and Private Networks.
Step 5: Finally, click on the OK button.
Method 2: from the command prompt
NOTE: These commands can be run from the command prompt or from PowerShell. For the demonstration, we will use the command prompt.
Step 1: Open the Run With dialog box Windows + R.
Step 2: In the Run dialog window, type cmd and keep the keys Ctrl + Shift + Enter. This opens the elevated command prompt.
Step 3: In the UAC window that appears, click Yes.
Step 4: To allow remote connections in the firewall, we must run the following command at the command prompt.
netsh advfirewall firewall set rule group="remote desktop" new enable=yes
Method 3: from PowerShell
This method is especially useful when you are writing a script that requires you to enable and disable remote desktop a couple of times.
Step 1: Open the Run With dialog box Windows + R.
Step 2: In the Run dialog window, type potencia Shell and keep the keys Ctrl + Shift + Enter. This opens the Elevated PowerShell window
Step 3: In the UAC window that appears, click Yes.
Step 4: To enable Remote Desktop, we must run the following command in the Elevated PowerShell window.
Disable-NetFirewallRule -DisplayGroup "Remote Desktop"
That is all.
We hope this article has been informative. Thank you for reading.
Please comment and let us know which method you like best.
Also, keep us posted if you have any issues.
Related posts:
 How to access Steam games without an internet connection
  How to view FPS with Xbox Game Bar in Windows 10: Steps Made Easy
  Hacked account? How to check and remedy
  How to make video calls from WhatsApp Web
  How to increase the RAM memory of a desktop or laptop + Tips and Tricks
  How to organize your YouTube subscriptions into categories
+ Tips and Tricks
How to organize your YouTube subscriptions into categories
+ Tips and Tricks


