


How to enable call forwarding on Android
In this guide, we will tell you how to activate call forwarding on Android smartphone. The ability to redirect our calls to a secondary number is something we always want. Almost all Android smartphones available today have this feature, but most users don’t know how to enable and use it.
Android’s call forwarding feature can be useful in various situations. For example, if you travel frequently, you can set up call forwarding on your secondary number to avoid roaming charges; you can forward calls to another number if you don’t want to be disturbed while on vacation.
Whatever the reason, it’s pretty easy to set up and activate call forwarding on an Android smartphone. You can use your Android’s call forwarding feature to redirect all calls to your home phone, your Google Voice number, or a local number.
Steps to enable call forwarding on Android
So, if you want to enable call forwarding on your Android device, you are reading the right guide. In this article, we will share a step-by-step guide on how to enable call forwarding on Android smartphone. Let’s check.
Important : Please note that not all Android devices have the same settings and menus. The Android user interface may vary from one smartphone to another. However, if you’re using the Google Phone app, it’s the settings.
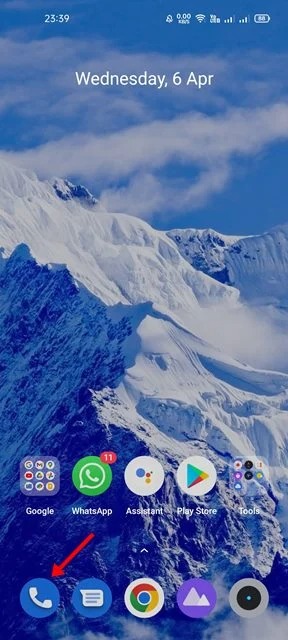
1. First of all, open the Phone app on your Android device.
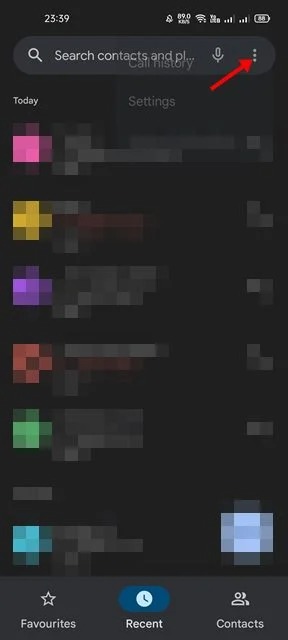
2. In the Google Phone app, tap the Three points as shown in the screenshot below.
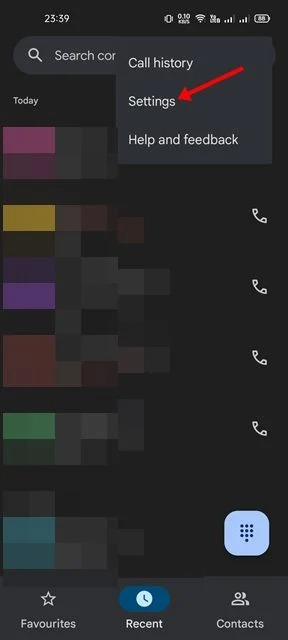
3. In the list of options, touch settings As shown below.
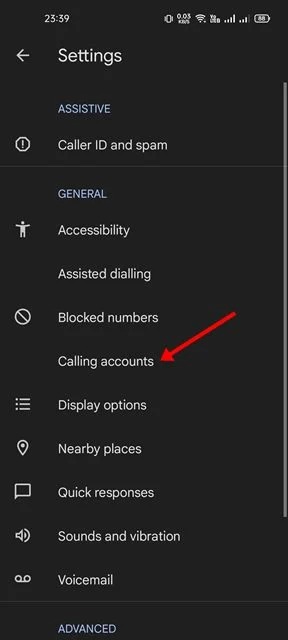
4. In the Google phone settings, touch the option calling accounts As shown below.
5. On the Calling Accounts page, scroll down and touch the option Call settings. Next, on the call settings page, scroll down and tap on the call settings option. call transfer As shown below.
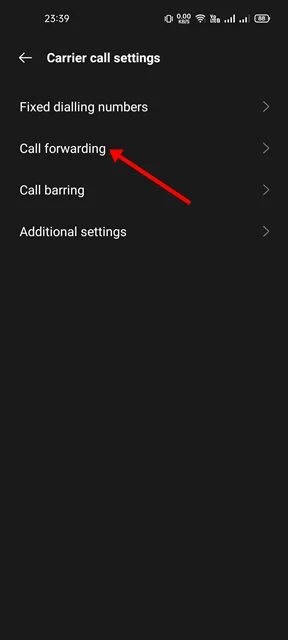
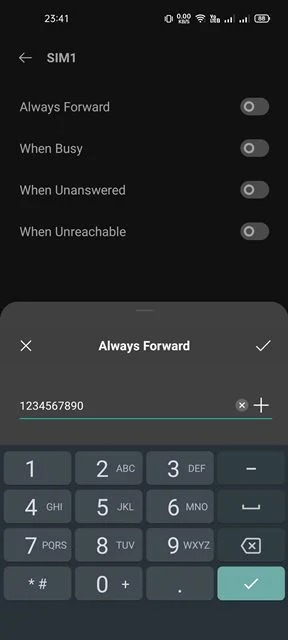
7. On the next screen, click the type of forwarding. Here you will find several options like Forward Always, Busy, No Answer, and Unavailable. Just choose the one you like the most.

8. Now you must enter the number where you want your calls to be forwarded. The process may take a few minutes.
That is! She has finished. Here’s how to activate the call forwarding option on your Android smartphone.
It is quite easy to enable call forwarding on your Android device. If you have any questions or suggestions, let us know in the comments. See also this guide if you want to learn how to configure call forwarding in android.
Related posts:
 How to access Steam games without an internet connection
  How to view FPS with Xbox Game Bar in Windows 10: Steps Made Easy
  Hacked account? How to check and remedy
  How to make video calls from WhatsApp Web
  How to increase the RAM memory of a desktop or laptop + Tips and Tricks
  How to organize your YouTube subscriptions into categories
+ Tips and Tricks
How to organize your YouTube subscriptions into categories
+ Tips and Tricks


