


Script execution is disabled on this system in PowerShell on Windows 11, 10
PowerShell is a good advanced cross-platform task automation solution. It is usually very easy to create and run a PowerShell script on a Windows system. But, it may be clogged with the “Script execution is disabled on this system.” error message if you run a script on your system. If your system administrator has set a policy to block unauthorized scripts from running on your system, you will see the specified error message. You must unlock the policy or modify the registry and you can run any script.
Solution 1: Modify the PowerShell
You can execute code without going through the current execution policy. So you don’t have to manipulate it, but you can run your script.
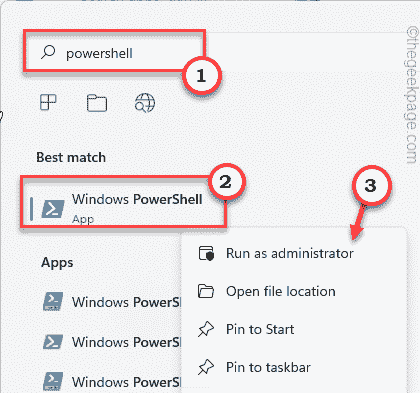
1. After pressing the button Tecla de Windows+S keys together, type “potencia Shell“.
2. Then right-tap on “Windows PowerShell” and touch “Execute as an administrator“.
3. When the Windows PowerShell screen appears, writes this code and modify it accordingly, and press Get into to run it.
powershell -ExecutionPolicy ByPass -File nameofthescript.ps1
[
Just replace the “nameofthescript.ps1” with the name of the script you are trying to run.
Example – Suppose, the name of the script is “myscript“, the command will be –
powershell -ExecutionPolicy ByPass -File myscript.ps1
]

This way, you can run any script without disturbing the current script execution policy. But, if you’re running scripts en masse or creating an automated script, this won’t work.
You have to look for the following solution for that.
Solution 2: Modify the execution policy
You can change the current execution policy settings if you prefer.
1. Press the button again tecla de Windows and type «potencia Shell“.
2. Later, right click “Windows PowerShell” and touch “Execute as an administrator” to open the terminal with administrative rights.
3. When it opens, writes this command to modify the execution policy as per your choice.
Set-ExecutionPolicy RemoteSigned
[
You can set the script Execution Policy to four different modes. These are –
Restricted – The default mode where PowerShell doesn’t allow any script to be run on the system.
AllSigned – Only the signed and authorized scripts shall be allowed to run in this mode.
RemoteSigned – In this mode, all the scripts that you have downloaded must have a signature of a trusted signature.
Unrestricted – You can run any script you prefer. No boundaries on trusted signature or trusted publisher.
Example – Suppose, you want to set the policy settings to ‘RemoteSigned’, the command will be –
Set-ExecutionPolicy RemoteSigned
]
After that, press “AND” and hit Get into.

4. If you encounter any error messages, just run this command.
Set-ExecutionPolicy RemoteSigned -Scope CurrentUser
Again, write “AND” and hit Get into.

Once you’ve done that, you can easily run the script however you like.
Try running the script.
NOTE –
Script execution policy is generally restricted because misconfigured or incorrect scripts can cause fatal damage to the system. So once you are done running the script, you can set the execution policy to ‘Restricted’ mode again.
1. Access PowerShell with administrative privileges.
2. Now just run this single code to restrict the execution of any policy on the system.
Set-ExecutionPolicy Restricted
3. Again, type “AND” and hit Get into.

After that, close the PowerShell window.
Solution 3 – Edit the registry
If you encounter any error messages while modifying the execution policy, you can edit the Registry Editor.
1. Just type “regedit.msc” in the search box on the taskbar.
2. After that, tap «registry editor” to access it.

Warning – You are going to modify your registration. Since Registry Editor is a very important part of your system, you should back up the registry beforehand.
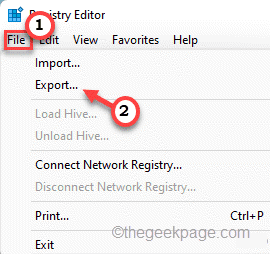
When Registry Editor opens, tap “Proceedings“. Then touch «To export” to create a new registry backup on your system.
Later, you can use this backup if things go wrong.
3. Now, expand the left side like this:
ComputerHKEY_LOCAL_MACHINESOFTWAREMicrosoftPowerShellShellIdsScriptedDiagnostics
4. Then, double touch the “Execution Policy” binary value.

5. Just type “Unrestricted” in the ‘Value data:’ box.
6. Then touch “OK” to save this change.

After this, close Registry Editor. Once you have closed the Registry Editor, reboot the system.
After your computer restarts, you can easily run a script of your choice.
Related posts:
 How to access Steam games without an internet connection
  How to view FPS with Xbox Game Bar in Windows 10: Steps Made Easy
  Hacked account? How to check and remedy
  How to make video calls from WhatsApp Web
  How to increase the RAM memory of a desktop or laptop + Tips and Tricks
  How to organize your YouTube subscriptions into categories
+ Tips and Tricks
How to organize your YouTube subscriptions into categories
+ Tips and Tricks


