


There was a problem starting when opening HDD
When Windows cannot read an internal or external hard drive, “There was a problem starting …” this error message appears on your screen. This error does not usually occur when the system boots, but appears while trying to open the HDD / SSD from a shortcut from another HDD. Don’t panic if you see this error message. It can happen due to malware or PUP existing on the hard drive.
Solution 1: run a full hard drive scan
Running your full HDD scan should detect and quarantine PUPs, system malware.
1. Open the File Browser on your system.
2. Then in the left pane, you will see the list of drives.
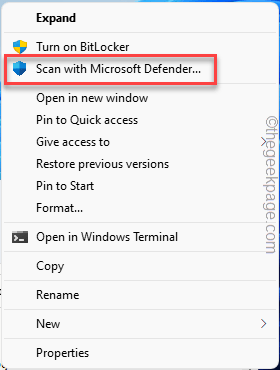
3. Now, right-click on the problematic hard drive and tap «Show more options”To access additional options.
4. Then tap «Scan with Microsoft Defender …”To scan your hard drive with Windows Security.
Windows Security will open and the scanning process will begin.
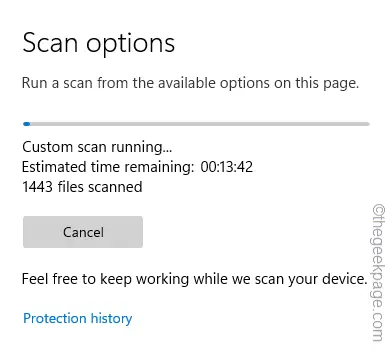
It will take time for the scanning process to finish. It will quarantine any foreign threats present in the unit. Now, try to access the drive using the shortcut again.
Fix 2: remove any pups
If there are any PUPs (potentially unwanted program) installed due to malware or other items, you will see this RunDLL error message.
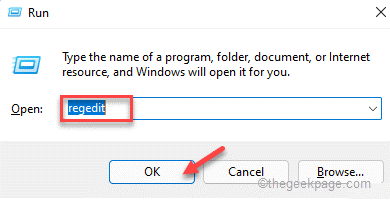
1. At first, press the Tecla de Windows +R keys together.
2. Then write «regedit«And hit Get into to access the Registry Editor.
Warning – A single incorrect key modification can irreversibly ruin your system.
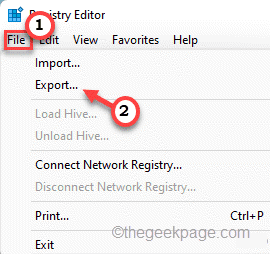
When Registry Editor opens, click «Proceedings“. Then touch «To exportTo create a new backup of the registry on your system.
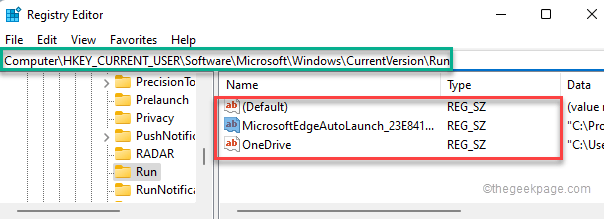
3. On the left side, navigate like this ~
HKEY_CURRENT_USERSoftwareMicrosoftWindowsCurrentVersionRun
4. On the right side, you will find some values associated with Microsoft or a third party.
5. Watch carefully if you can find any suspicious entries here.
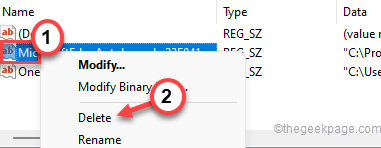
6. Then simply right-click on the suspicious puppy and then tap on «Delete“.
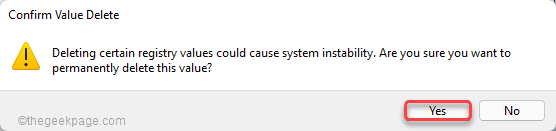
7. If you notice a message, touch «Yes”To remove it from your computer.
8. Then go to these registry locations and check if you can find any suspicious registry values.
If you can find one, remove it by following the same steps we discussed above.
HKEY_CURRENT_USERSoftwareMicrosoftWindowsCurrentVersionRunOnce
HKEY_LOCAL_MACHINESoftwareMicrosoftWindowsCurrentVersionRun
HKEY_LOCAL_MACHINESoftwareMicrosoftWindowsCurrentVersionRunOnce
Once you are done removing all the Registry Editor entries, close it and restart your computer.
After restarting your device, try accessing the hard drive one more time.
Solution 3: remove AutoRun.inf from affected drive
The AutoRun.inf file is used to automatically run the AutoRun and AutoPlay components on a storage drive. If there is any corrupted AutoRun.inf file on the affected drive, it can cause this problem.
Paso 1
1. Open File Explorer.
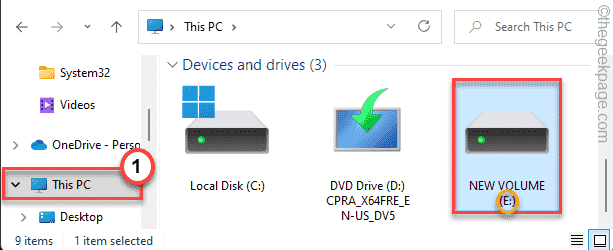
2. Then tap on the «This PC“.
3. Here you will find all connected drives and devices. Make a note of the letter of the affected drive.
Is “ME:” in our case.
Paso 2
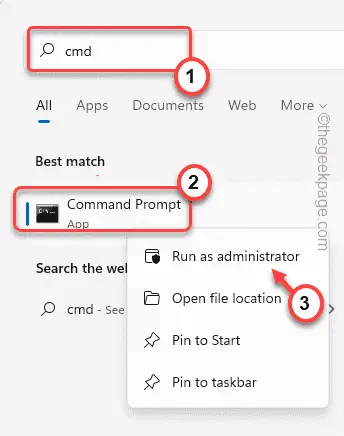
1. At first, press the Windows key and write «cmd“.
2. Then, right-click on the «Symbol of the system«And it touches»Execute as an administrator“.
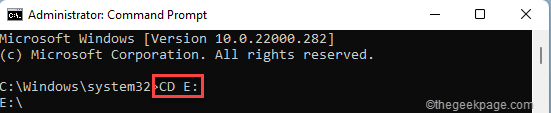
3. Now, you need to navigate to the affected drive using the CD command.
CD affected drive letter:[ Just replace the “affected drive letter:” with the drive letter you are facing this trouble with.
Example – In our case, the drive letter is “E:“. So, the command will be-
CD E:]
4. Now, copy get these two commands and hit Get into to delete the autorun.inf file.
Attrib -r -s -h e:autorun.inf
Del /F e:autorun.inf
[As you can understand that the “f:” is the drive letter of the affected drive.
You can replace it with the drive letter of the affected system on your system.]

Once the process is complete, close the command prompt terminal and restart the system at once.
Then try to access the HDD again. This time it will open normally.
Solution 4: run a disk scan
You must run a verify disk operation to scan and repair the affected drive.
1. At first, press the Windows key + E keys together.
2. Go to «This PC“.
3. When the File Explorer window opens, right-click on the affected drive and tap “Properties“.
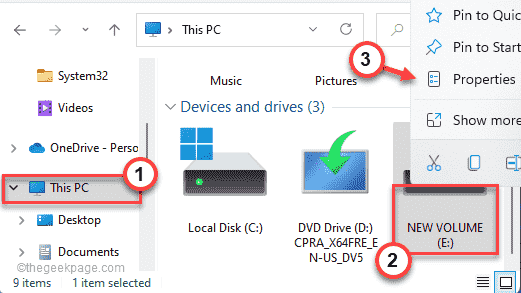
4. In the Properties window, go to «Instruments” tab.
5. Here, in the «Error checking» part, tap «Cheque”To check the disc.

6. Now, touch «Scan and repair the drive”To allow Windows to scan and repair the affected drive automatically.
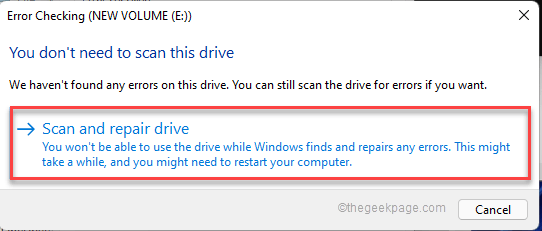
Give Windows a little time to repair your computer’s drive.
Solution 5: delete the BackgroundContainer task
The BackgroundContainer task can cause this problem in some of the cases. Removing it should help you.
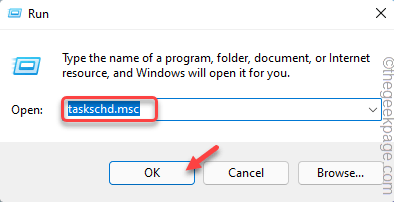
1. At first, press the Tecla de Windows + R keys together.
2. Then write «taskschd.msc«And hit Get into.
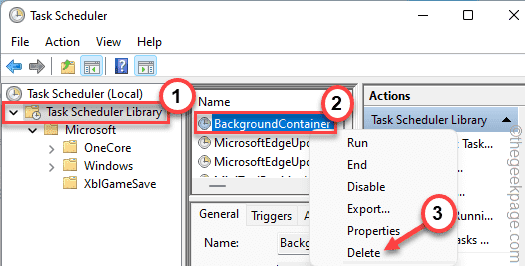
3. Now, tap on the «Task Scheduler Library” On the left side.
4. Then, on the right side, right-click on «Bottom Container“Task and tap”Delete”To remove it.
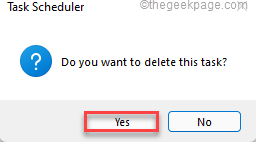
5. Again, touch «Yes”To remove the task from your system.
After that, close the Task Scheduler on your computer. Then perform a normal system reboot.
After rebooting, try accessing the hard drive again. This time it will open without any further problems.
Related posts:
 How to access Steam games without an internet connection
  How to view FPS with Xbox Game Bar in Windows 10: Steps Made Easy
  Hacked account? How to check and remedy
  How to make video calls from WhatsApp Web
  How to increase the RAM memory of a desktop or laptop + Tips and Tricks
  How to organize your YouTube subscriptions into categories
+ Tips and Tricks
How to organize your YouTube subscriptions into categories
+ Tips and Tricks


