


How to fix CDPUserSvc could not read description (error code 15100)
CDPUserSvc or Connected Device Platform User Service is an essential service that works in the background while your system tries to connect with a Bluetooth device, printer or scanner or any other device. While your computer uses this service to connect to devices successfully, you can disable it if you are not connecting to any device. But when disabling it manually, you might see this error message: «CDPUserSvc could not read the description (error code 15100)“. There are alternative ways to solve this problem.
Solution 1 – Detach CDPUserSvc from main service
One of the simplest solutions is to separate CDPUserSvc from the main service process.
1. At first, press the Windows key and write «cmd“.
2. Then, right-click on the «Symbol of the system«And it touches»Execute as an administrator“.
3. Now, to write write down this code in the terminal and press the Get into key to isolate the CDPUserSvc process.
sc config cdpusersvc type=own

Once you have done this, close the command prompt screen.
After, restart your computer.
Solution 2: use Registry Editor
You can use Registry Editor to disable the particular service.
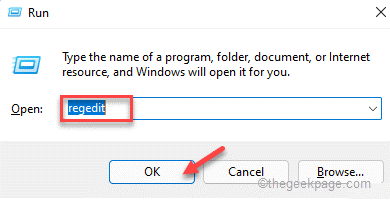
1. At first, right-click on the Windows icon and tap «To run“.
2. Then write «regedit“And click”OK”To access the Registry Editor.
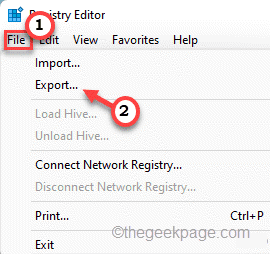
Warning – Sometimes these registry edits can crash your entire system. In that case, a simple registry backup can save your system. So, follow this simple step to create a registry backup.
When Registry Editor opens, tap «Proceedings“. Then click on «To export”To create a new registry backup on your system.
3. On the left side, expand the left side like this ~
ComputerHKEY_LOCAL_MACHINESYSTEMCurrentControlSetServicesCDPUserSvc
4. Now, on the right side, you will find the «Start” value.
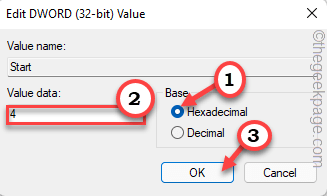
5. Solo, double click in the value to edit it.

6. Next, set the bast to «Hexadecimal” system.
7. Also, set the value to «4“And click”OK“To save him.
After doing that, close the Registry Editor. Later, restart your computer.
Solution 3: create and run a batch file
You must create a batch file and schedule it to run at system startup. This will prevent CPDUserSvc from running on the system.
Paso 1
1. First, write «Bloc”In the search box.
2. Then tap «Bloc“To open it.

3. When Notepad opens, copy get These lines.
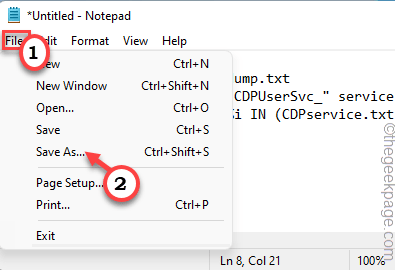
@ECHO OFF
SC QUERY state= all>servicesdump.txt
FINDSTR /L /C:"SERVICE_NAME: CDPUserSvc_" servicesdump.txt >CDPservice.txt
FOR /F "usebackq tokens=2" %%i IN (CDPservice.txt) DO SET CDPUserSvc=%%i
NET Stop "%CDPUserSvc%"
SC Delete "%CDPUserSvc%"
DEL CDPservice.txt
DEL servicesdump.txt
4. After that, tap on the «Proceedings”In the menu bar.
5. Then click on «Save as…“.
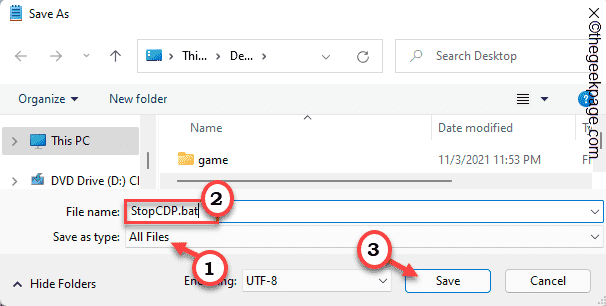
6. Now select the «File type:» as «All the files“.
7. Thereafter, name the file as «StopCDP.bat“.
8. Choose a location on your computer (preferably Desktop) to save the file. After that, click on «Save money”To save the file.
Once you’ve done that, close the Notepad window.
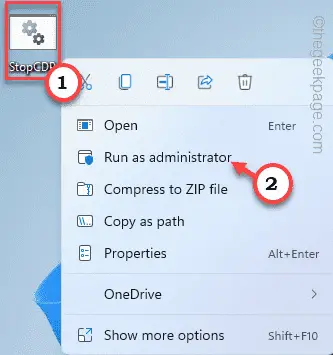
9. Now go to the location where you saved this batch file.
10. Then, right-click on the «Stop CDP«And it touches»Execute as an administrator”To run the script on the system.
Once you have run the script file, you will not experience the problem again.
But this solution is temporary, that is, you need to run this script again the next time you reboot your machine. Otherwise, you can create a simple task for Windows to automatically run the script on every startup.
Paso 2
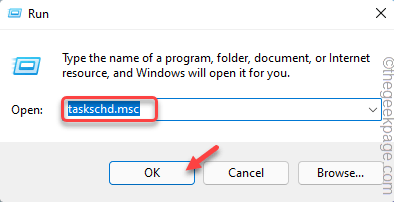
1. Press the Tecla de Windows + R keys together.
2. Then write «taskschd.msc“And click”OK”To open Task Scheduler.
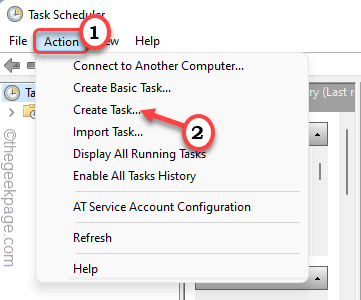
3. When Task Scheduler opens, tap «Action«In the menu bar and touch»Create task …“.
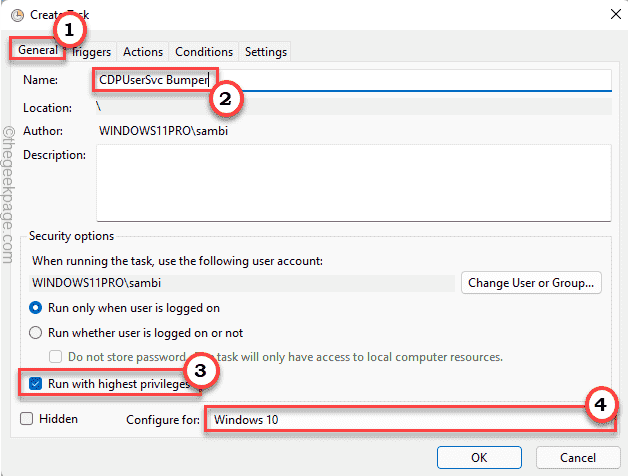
4. Then go to «General” tab.
5. Here, give this new task whatever you want. (We have called it “CDPUserSvc Bumper”).
6. Now, check the box «Run with highest privileges»Option.
7. Next, click on the drop-down menu next to “Configure for:” and set it to “Windows 10”From the drop-down menu.
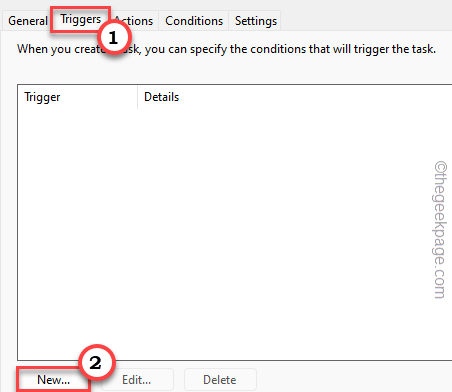
8. In the next step, go to «Triggers” tab.
9. Now select the «New…”To create a new trigger.
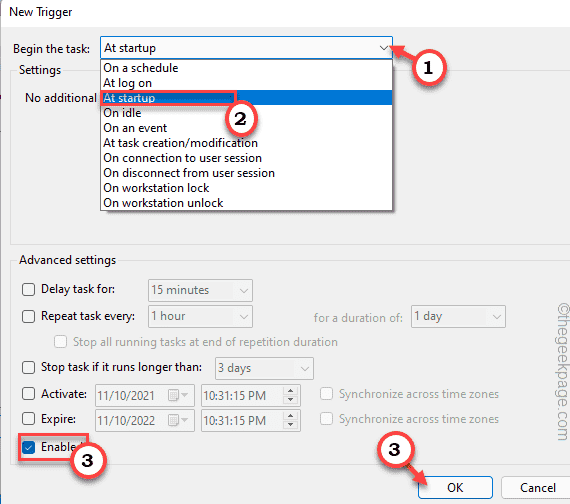
10. After that, set the option ‘Start task:’ to «At the beginningpag ».
11. Now, cheque the “Activated”Option at the bottom.
12. Also, touch «OK“To save this.
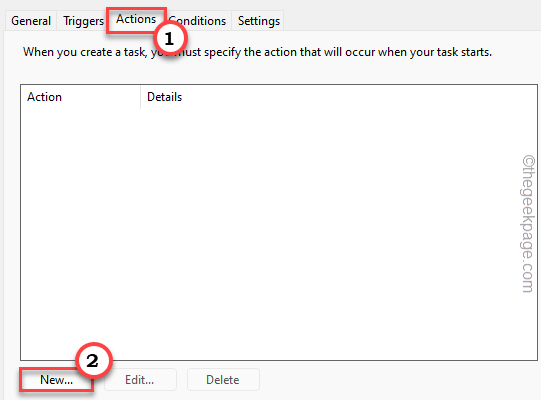
13. Now, go back to the «Behaviour” tab.
14. Here, tap «New…“.
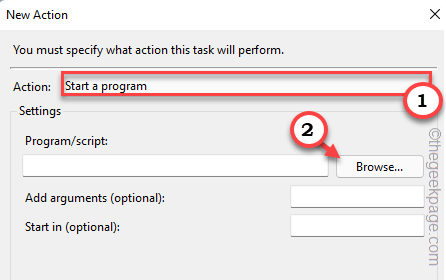
15. In the New Action panel, set the “Action:” tab to “Start a program“.
16. Also, touch «Browse“.
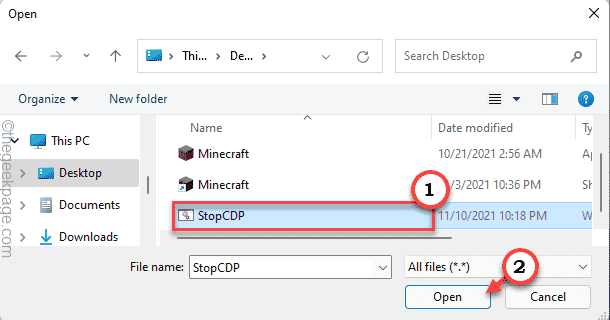
17. Now go to the location where you saved the batch file.
18. Select the «Stop CDP«File and tap»Opened“.
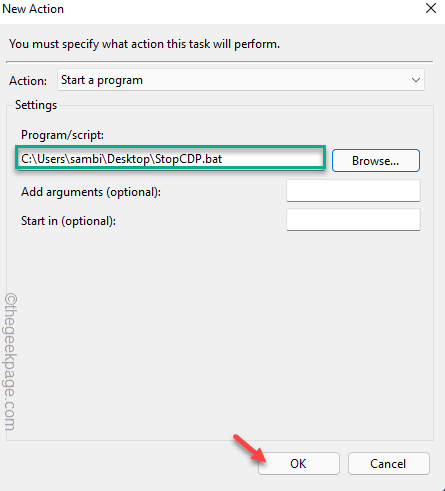
19. Once you have done that, click on «OK“To save him.
20. Finally, once you have configured it, tap on “OK“For the last time.
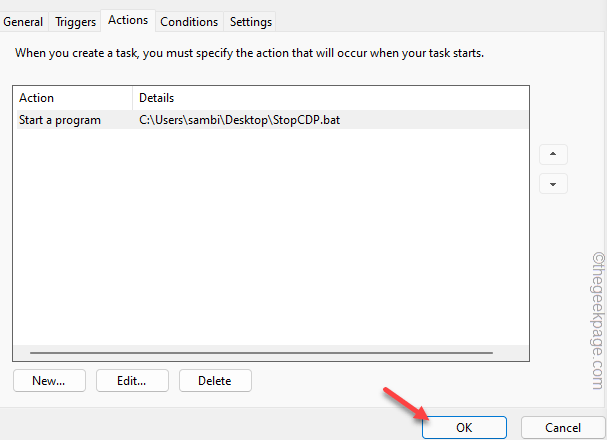
Close Task Scheduler. Later, restart your computer. As your system boots, the script file will run and stop the CPDUserSvc component at startup.
You will not see the error message again.
Solution 4: disable automatic store updates
Some users have noticed that the automatic update feature of the Microsoft Store may be to blame for this problem.
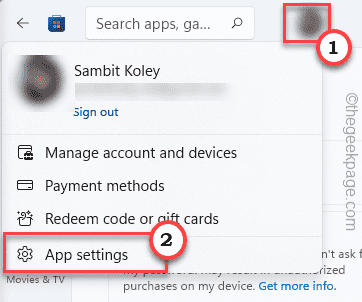
1. Abra Microsoft Store.
2. Once the Store opens, tap your account image at the top of the screen.
3. Then click on «Application Settings“To access it.
4. Now, change the «App updates«Configuration a Off condition.
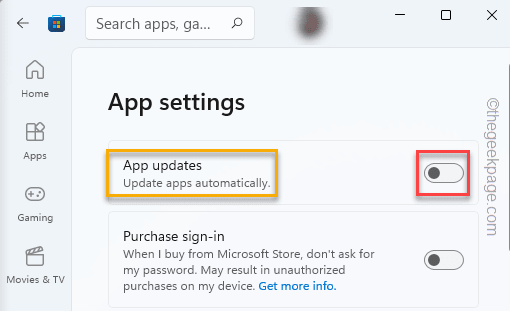
This way, the Store will not update your apps automatically. This should stop the problem.
NOTE –
Don’t worry if you can’t modify the Store settings due to strict group policy settings. There is a certain registry modification that you can implement.
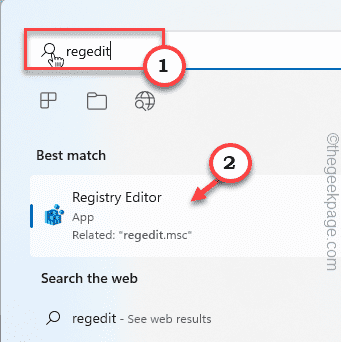
1. At first, press the Windows key and write «regedit“.
2. Then touch the «Registry editor“To open it.
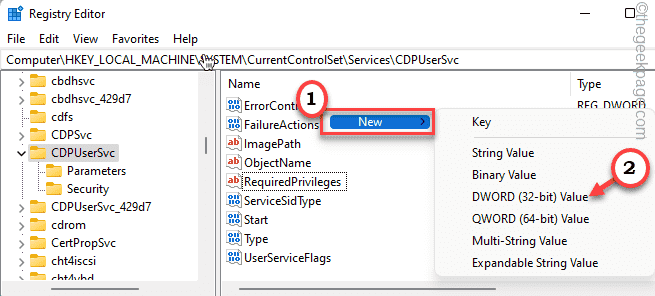
3. When Registry Editor opens, go here:
HKEY_LOCAL_MACHINE SYSTEM CurrentControlSet Services CDPUserSvc
4. On the right side, right-click on the space and tap «New> “ and click “Valor DWORD (32 bits)”To create a new value.
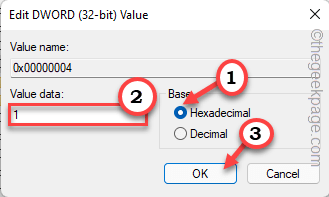
5. Now name this new value «0x00000004“.
6. So, double click in this value to edit it.

7. At the beginning, choose «Hexadecimal”Base.
8. Then set the value to «1“.
9. Finally, click on «OK”To save this change.
After that, close the Registry Editor. Now, restart your computer for these changes to take effect.
Solution 5: use system restore
If nothing is working for you and you want your system to function normally, system restore is the only recourse.
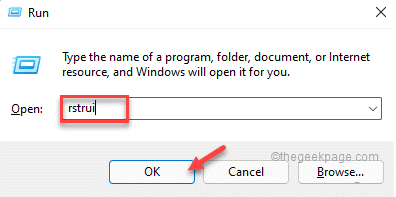
1. At first, right-click on the Windows icon and tap «To run“.
2. Then write «rstrui“And click”OK”To open System Restore.
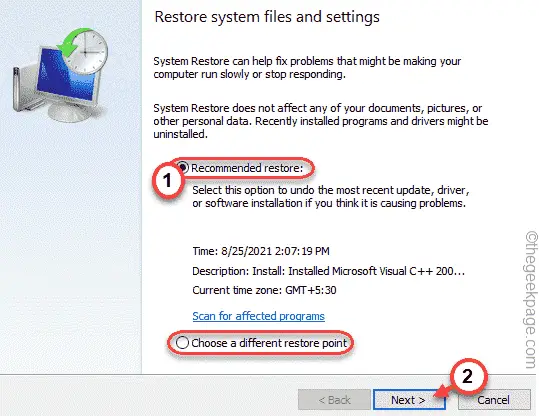
3. When the System Restore window opens, select «Choose a different restore point»Option.
4. Then click on «next“To go to the next step.
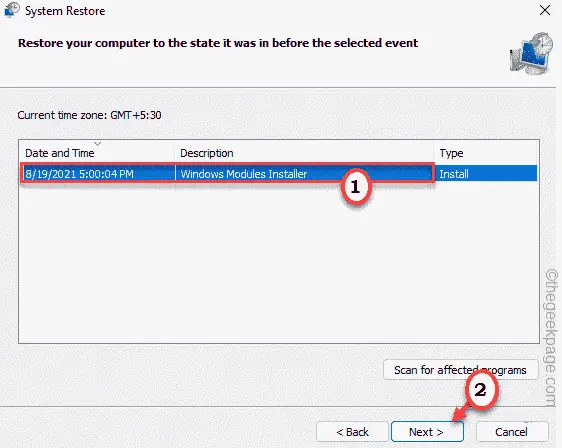
5. Next, choose a restore point from the list of recommended restore points.
6. After that, tap «next»To go further.
7. Finally, touch «End up”To finalize the process.
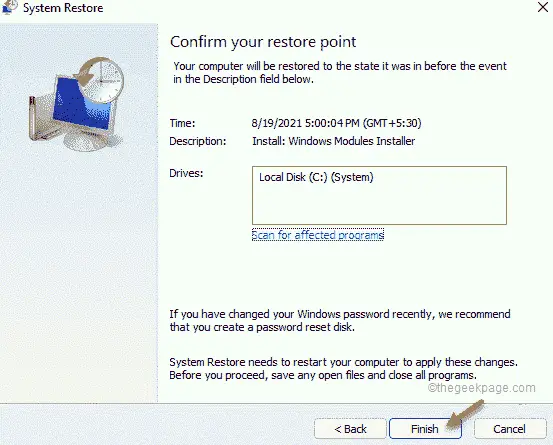
Your computer will start up and restore itself to the state it was working well in.
Your problem should be solved.
Related posts:
 How to access Steam games without an internet connection
  How to view FPS with Xbox Game Bar in Windows 10: Steps Made Easy
  Hacked account? How to check and remedy
  How to make video calls from WhatsApp Web
  How to increase the RAM memory of a desktop or laptop + Tips and Tricks
  How to organize your YouTube subscriptions into categories
+ Tips and Tricks
How to organize your YouTube subscriptions into categories
+ Tips and Tricks


