


Download Windows Recovery Tool
Download Windows Recovery Tool


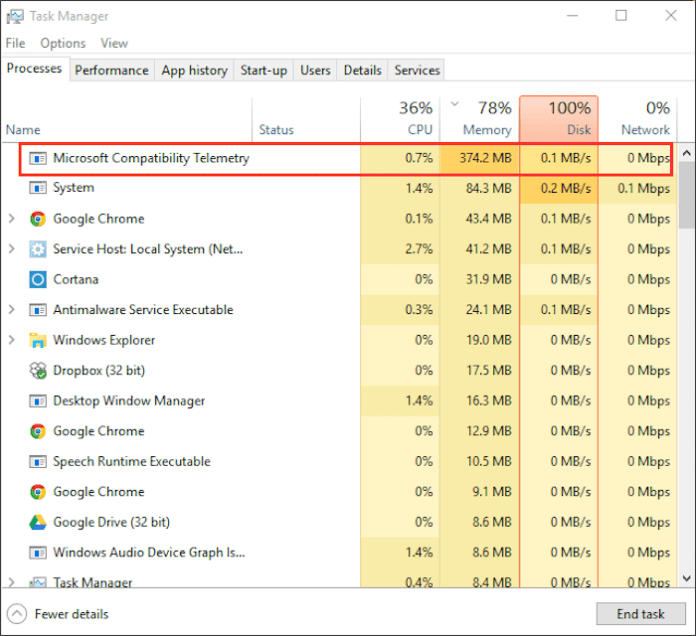
There are special recovery utilities for Windows that can solve problems related to registry corruption, file system malfunction, instability of Windows drivers. We recommend using Advanced System Repair to fix the Microsoft Compatibility Telemetry High CPU and Disk Usage (CompatTelRunner.exe) issue in Windows 10.
1. Make sure Windows has downloaded all updates.
Before disabling the Telemetry service itself, you should first install the latest updates. There is a possibility that Microsoft Compatibility Telemetry is not working properly. If you haven’t updated your system for a long time, downloading new updates may solve the problem. To check if you have new updates, do the following:
- Click on Windows Key + I at the same time to open Options… Please select Updates and security.
- In the right pane, click Checking for Updates… Wait for Windows to find new updates and install them. Sometimes users will see a button Install right away, since Windows has already found the updates ahead of time.
- After the update process is complete, restart your computer and check if anything has changed.
2. Check the integrity of the system files.
It is unlikely that Microsoft Compatibility Telemetry may not function correctly due to missing or damaged files. Such files are usually linked between many Windows services that allow for proper communication. If some of these files are missing, then this can cause problems with this service. Below we will use both SFC (System File Checker) and DISM (Deployment Image Servicing and Management) to help locate and repair missing components. Here’s how:
With SFC
- Open up Command line by introducing
cmdin the search box next to Start Menu button. - Right click on Command line and select Run as administrator.
- After opening the console, enter
sfc /scannowcommand and press Enter. - When the recovery process is complete, restart your computer.
Using DISM
- Open up Command line as we did in the previous step.
- Copy and paste this command
DISM.exe /Online /Cleanup-image /Restorehealth. - Click on Enter and wait for Windows to finish scanning and fixing.
- After that, restart your computer and install the update again.
After completing these scans, restart your computer and check if the CPU and Disk resource consumption has changed. If that doesn’t work, continue with the other steps listed below.


